Make sure you are connected to the internet before you run CmapTools. If a list of Places (CmapServers) is not display when you click on the "Shared Cmaps in Places" button of your Views window, it could be because your machine is behind a firewall or using a proxy server to access the Internet. If you have a firewall on your computer, or your access to Internet is through a firewall, the firewall must be configured to allow requests through specific ports and protocols to go through.
You may need to contact your systems administrator if the firewall is part of the local area network your computer is attached to. The specific ports that need to be opened depends on the servers you are accessing:
Port   Mode   Protocol Description of service

4447   Output  TCP     Connect to most CmapServers.
8080   Output  TCP     Connect for IHMC Public Cmaps, IHMC Public Cmaps(2) & (3),
                       IHMC Cmappers, IHMC Sample Knowledge Models
443    Output  Web     Web connect for IHMC Public Cmaps, IHMC Public Cmaps (2) & (3),
                       IHMC Cmappers, IHMC Sample Knowledge Models
80     Output  TCP     Connect for IHMC Cmap Cloud.
4747   Output  TCP,UDP Connect to the Directory of Places to get the list
                       of CmapServers.
4747   Input   UDP     Broadcast discovery of Places located on the LAN.
4999   Output  TCP     CmapTools' WebSearch Server.
5001   Output  TCP     WordNet Server.
8001   Output  TCP     Web server of the CmapServer (Place).
31099  Output  TCP     Communication with the Index Server. Used by the
                       CmapTools' Search.
If access to the Internet is through a proxy server, you need to configure the proxy settings by going to the "Preferences" menu entry (Edit/Preferences in the Views window) and selecting the "Proxy Configuration" tab.
IHMC CmapTools log files are stored on a folder titled "CmapToolsLogs" under the user's home directory. The Home directory is the area of the file system where personal files are stored by default. In other words, the home directory is a file system directory which contains the personal files of a given user of the system.
The name of the home directory depends on the operating system, but in all cases it includes the username (also known as user id). In the following list, select the operating system you are using and replace "User_Name" with the username you used to log on the system.
The following procedure describes what is needed to dynamically map the Windows-assigned drive letter your USB drive for CmapTools configuration purposes (this only works for Windows):
Open a command prompt window (Start -- > Run., then type "cmd" in the box Click "OK").
For the CmapTools configuration we will assume that the public computers do not assign the letter "Z" to any other drive on the machine. We need to reassign the USB drive letter to "Z" (in the example below, the USB drive received the letter "E" from Windows as it was plugged in). Type this at the command prompt and press "Enter":
subst Z: E:\
Install CmapTools in the USB drive, using the drive letter "Z" for these parameters in the installation:
Run CmapTools for the first time, filling in the boxes with your profile information when prompted.
From the command prompt, create the following file in the root of your USB drive by typing:
copy con Start.txt
subst Z: ^z (press the Ctrl key and the letter "z" simultaneously. Leave a space between the Z: and ^z.)
@echo off
cd \
copy Start.txt Start.bat > nul
cd >> Start.bat
echo \"IHMC CmapTools"\CmapTools.lnk >> Start.bat
start /min Start.bat ^& exit
Now, when you want to run CmapTools from your USB drive:
IHMC CmapTools requires Java to run, but you don't need to install java.
The CmapTools installer automatically installs the appropriate version of Java to run CmapTools. Java binary files are copied to the same CmapTools installation directory. This is on Windows, Mac OS X, and Linux computers without causing any conflict with other Java versions installed on the computer.
In some languages it is necessary to have two or more linking phrases in between concepts to correctly build concept maps.
e.g.:
concept --- > linking-phrase 1 ----> linking-phrase 2 -----> concept
Use <ctrl><shift> while dragging the mouse from a concept. When you click, the linking phrase will be created but no new concept. You can then link to a new concept or to a new linking phrase.
CmapTools and CmapServer are written in Java. The Java Virtual Machine (JVM) is assigned a specific amount of memory when launched, and is limited by that amount. On the other hand, the JVM consumes memory until it uses all the memory allocated to it, so you need to be careful not to allocate too much memory, particularly if your computer does not have a lot of memory.
If you are using many images/pictures as background to concepts or Cmaps, have opened and saved a lot of Cmaps from servers on the same session (which requires the generation of an image file for the Web Page version of the Cmap when saving), you have dozens of Cmaps opened, or have Cmaps with thousands of nodes, you may be experiencing "Out of Memory" problems.
By default, IHMC CmapTools is assigned 256 MB for the minimum heap size and 512 MB for the maximum heap size of memory. The IHMC CmapServer is assigned 512 Mb and 1024 Mb respectively. This has been found to be adequate for most users.
To increase this amount, you need to modify a file called "CmapTools.lax" for CmapTools (or "CmapServer.lax" for CmapServer) which is found in a directory (folder) called "bin", under the directory (folder) where the CmapTools (or CmapServer) program was installed. Read the FAQ entry titled What is the folder that CmapTools & CmapServer installs to? in order to know the default installations of CmapTools and CmapServer.
Under Windows/Linux (see below for Mac OS X):
Inside the file, using a text editor (e.g. NotePad, vi, textedit), find the line that indicates, in bytes, the amount of memory that will be used by CmapTools (or CmapServer). It should look something like (the number at the end may be different):
lax.nl.java.option.java.heap.size.max=536870912
where the number at the end indicates the number of bytes. To increase the amount of memory, for example to 768 MB, you need to change the line to:
lax.nl.java.option.java.heap.size.max=805306368
where 805306368 bytes = 768 * 1024 * 1024 = 768 MB
For this change to take effect, save the file and start CmapTools (or CmapServer) again.
Under Mac OS X:
Locate the folder where the CmapTools (or CmapServer) application is installed. Open the "bin" folder.
Right-click on the "CmapTools.app" (or "CmapServer.app") file and select "Show Package Contents".
Open the "Contents" folder.
With a text editor, edit the "Info.plist" file.
Look for the entries:
<string>-Xms256M</string>
<string>-Xmx512M</string>
These are the minimum and maximum sizes in megabytes. Change and 256M and 512M for whatever value you need, particularly the maximum size.
For this change to take effect, save the file and start CmapTools (or CmapServer) again.
The CmapTools client and the CmapServer can be configured to save the Cmap as an CXL file (XML) instead of as a serialized java object. (A description of the CXL format can be found here).
In the "cmaptools.cfg" file, in the bin directory in the folder where CmapTools is installed, add the entry:
save.as.xml=true
The Cmap will be stored in a file with extension ".cmap" but the components will be xml files, with the Cmap being in CXL format. The ".cmap" file is really a zip file and can be unzipped with any utility.
Press and hold the <Shift> key down while you create your link to either an existing or new concept.
To permanently change the setting you need to modify the "cmaptools.cfg" configuration file which is located in bin directory in the folder where CmapTools is installed.
With a text editor, locate the entry:
Change the last line to read:
Before opening CmapTools, you should first make sure that the projector is securely connected to your computer and that the resolution is set the way it will be used during the presentation. If the resolution on the projector is changed after launching CmapTools, the Presentation Builder will not be aware of the change.
To determine on which of the "screens" to display, the Presentation Builder uses the location of the top left corner of the Cmap window where the Presentation Builder is started. This is particularly important if the projector is not mirrowing the display on the computer. Make sure the tope left corner of the Cmap windows is located in the projector's display.
If using a Mac OS X computer, you can select not to mirror the computers screen on the projector, thereby avoiding have the Menu entries displayed in the projector. This selection is done in the Displays entry of the System Preferences.
No, we do not distribute the source code of CmapTools. The software is not Open Source, although CmapTools is free to distribute. Only the executable programs are available at the CmapTools download page.
A grayed out Place (CmapServer) means that CmapTools is aware of the existence of the Place, but is unable to establish a connection to it. This could happen because of several reasons:
If only some of the Places appear grayed out, it means that those Places that are grayed out are not accessible at this moment. This could happen because the CmapServers for those places themselves are behind firewalls, in which case they register with the Directory of Places making their existence known, but your computer cannot access them. These Places will continue to appear gray unless the firewalls that are protecting them are configured to allow connections to come through. Or, the Place may be grayed out because CmapTools "remembers" it has contacted that CmapServer before, but at this point the CmapServer is not responding (the CmapServer may be down, or its connection to the Internet broken). CmapTools will periodically try to contact the CmapServer until it establishes the connection, or, after a few days, will give up and remove it from its list of known CmapServers. If the CmapServer comes online again, CmapTools will add it to its list after finding out about it through the Directory of Places.
If all the Places are grayed out, and have always been grayed out, then you need to check whether your computer is behind a firewall or uses a proxy server to access the Internet (see the FAQ: Cannot access the Places or Cmap Cloud).
If all the Places are grayed out, and CmapTools has been able to access some Places before (the have appeared "colored"), your connection to the Internet is probably down. CmapTools remembers those Places from the list it keeps, but is unable to contact them. Check your Internet connection (e.g. dial up-connection has disconnected, cable connection to DSL or cable modem is disconnected, etc.) You may want to test whether other programs are able to connect to the Internet (e.g. a Web browser) to ensure the link is working.
Install CmapTools from the command line
Download the latest version of CmapTools for Linux from here.
Download the installer of CmapTools according to your Linux architecture (32 o 64 bits).
If you don't know whether your system is 32-bit or 64-bit, open a Terminal or shell window and type the command arch. The arch command displays whether the system is 32-bit ("i686") or 64-bit ("x86-64").
If your Linux is 32-bits download the installer ---> Linux32CmapTools_vx.xx_mm-dd-yy.bin
If your Linux is 64-bits download the installer ---> Linux64CmapTools_vx.xx_mm-ddyy.bin
x.xx is the CmapTools version
dd-mm-yy is the publishing date
Change the file attribute of the installer to be executable, by typing the following command from a Terminal session:
chmod +x Linux32CmapTools_vx.xx_mm-dd-yy.bin or
chmod +x Linux64CmapTools_vx.xx_mm-dd-yy.bin
If you downloaded the Installer and have permissions to install the program, run the following command:
./Linux32CmapTools_vx.xx_mm-dd-yy.bin -i GUI or
./Linux64CmapTools_vx.xx_mm-dd-yy.bin -i GUI
If you didn't download the installer, or you are not the owner of the installation file, you must run the installer as root (administrator), by typing the following command instead. You will most likely be prompted for the user password.
sudo ./Linux32CmapTools_vx.xx_mm-dd-yy.bin -i GUI or
sudo ./Linux64CmapTools_vx.xx_mm-dd-yy.bin -i GUI
Follow the Installation Program's instructions.
Install CmapTools from the graphic interface
Download the latest version of CmapTools for Linux from here.
Download the installer of CmapTools according to your Linux architecture (32 o 64 bits).
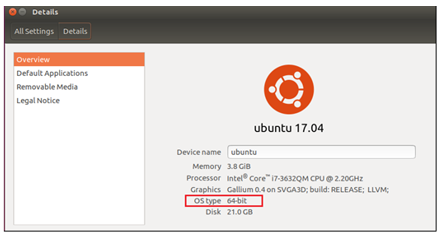
If you don't know whether your system is 32-bit or 64-bit, click System Menu (gear at top right corner), click "About This Computer", and read "OS type" field. A 32 bit OS will read "32-bit" and a 64 bit OS will read "64-bit".
If your Linux is 32-bits download the installer ---> Linux32CmapTools_vx.xx_mm-dd-yy.bin
If your Linux is 64-bits download the installer ---> Linux64CmapTools_vx.xx_mm-ddyy.bin
x.xx is the CmapTools version
dd-mm-yy is the publishing date
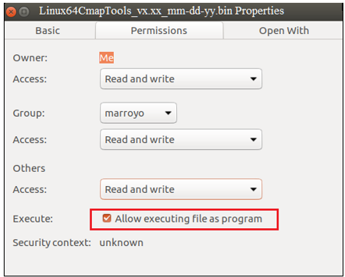
Change the downloaded installer to be executable, right click on the file and select properties. Under the Permissions tab. Tick the checkbox labeled "Allow executing file as program". Then Close the properties Windows.
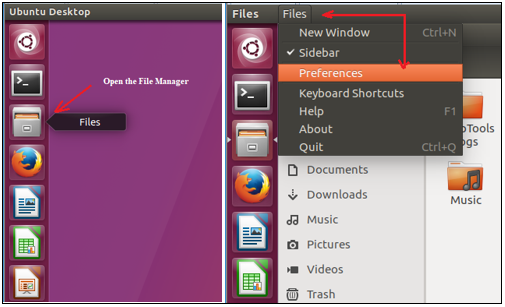
File Manager in Ubuntu Gnome desktop cannot run a .bin file using double-click, also you cannot double-click on an executable text file (script) for security reasons. Then, rename the CmapTools installer from "Linux64CmapTools_vx.xx_mm-dd-yy.bin" to "Linux64CmapTools_vx.xx_mm-dd-yy" (remove the file extension), and change the File Manager default configuration. Open the File Manager; select "Files- Preferences".
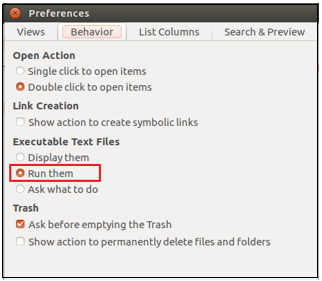
Open the "Behavior" tab, and select "Run them" under "Executable Text Files".
Now you can double-click on the CmapTools installer from the File Manager to run it.
Execute the CmapTools installer and follow the instructions.
Permissions and sharing in CmapTools is done at the folder level, so only folders can be shared; individual Cmaps cannot be shared, you need to share the folder that contains them. The sharing of a folder in the Cmap Cloud is done at the Cmap Cloud website.
Login to the Cmap Cloud. Use your Cmap Cloud credentials, the same email address and password used to access the Cmap Cloud from CmapTools.
Go to the CmapTools in the Cloud (Cmaps) section of the Cmap Cloud.
Select the folder you want to share. If its a subfolder, navigate to the folder by double-clicking on the enclosing folders until you are able to select the folder to be shared.
Click on the "Share" Action on the left.
Add each of the users you want to share the folder with. The users you share with need to have accepted you as their "Cmapper" (buddy or friend). If they are already a Cmapper of yours, they should appear on the list on the left of the dialogue box -- select each of them and click on the down arrow. If they are not a Cmapper, type their email address on the right and click on the down arrow. You can add as many users to the Share request as needed.
Select the type of permissions you want to grant. You may limit users to only Viewing, to Viewing and Annotate, or give permissions that allow editing the contents of the folder. Annotating allows the addition of "Post It" annotation notes but not the editing of the Cmaps.
Click on Share.
For users that are already your Cmappers, a shortcut (alias) to your folder will be created on their Home Folder and they will receive a Cmap Cloud message telling them the folder is accessible.
For users that have a Cmap Cloud account but are not your Cmappers, a Cmap Cloud message is sent asking them whether they accept being your Cmapper. If they accept, and accept the Share, the shortcut (alias) will be created.
For users who do not have a Cmap Cloud account, an email message will be sent inviting them to create and account, sign in, and accept you as a Cmapper.
Shared folders have a different icon, with a "hand" indicating they are shared.
Selecting a folder and clicking on the Share action allows you to modify the users and type of sharing for that folder.
Your folder can now be accessed, by users with whom you have shared it, using CmapTools or CmapTools in the Cloud. From CmapTools, two users can edit the same Cmap real-time (synchronous collaboration) if both open the Cmap and edit it. The first one to edit the Cmap must approve the collaboration requests from the other users. CmapTools in the Cloud does not currently allow real-time collaboration.
The following shortcuts are available for CmapTools. The shortcuts are shown for Windows and OS X. Note that some shortcuts are not available for both Windows and OS X.
From the Views Windows:
Description                                      Windows       Mac OS X

- Open a new Cmap for editing                    ctrl+N        command+N
- Create a new folder                            ctrl-shift+N  shift+command+N
- Open selected Cmaps, folders or resources      enter         return
- Close the Views window                         ctrl+W        command+W
- Print the current view                         ctrl+P        command+P
- Exit CmapTools                                 ctrl+Q        command+Q
- Hide CmapTools                                               command+H
- Hide all other windows except CmapTools                      option+command+H
- Cut selected Cmaps, folders and/or resources   ctrl+X        command+X
- Copy selected Cmaps, folders and/or resources  ctrl+C        command+C
- Paste resources from the clipboard onto a
  selected folder                                ctrl+V        command+v
- Rename a selected Cmap, folder, or resource    F2            F2
- Delete selected Cmaps, folders, and/or
  resources                                      Delete        command+delete
- Refresh the contents of the current view       F5            F5
- Display the properties of a selected Cmap,
  folder or resource                             alt+enter     option+return
- Close the Views window                                       option+F4
From an Open Cmap:
Description                                      Windows       Mac OS X

- Open a new Cmap for editing                    ctrl+N        command+N
- Close the active Cmap                          ctrl+W        command+N
- Save the active Cmap                           ctrl+S        command+S
- Open the "Save Cmap As" dialogue box           ctrl+shift+S  shift+command+S
- Print the active Cmap                          ctrl+P        command+P
- Exit CmapTools                                 ctrl+Q        command+Q
- Undo the last action performed on the active
  Cmap                                           ctrl+Z        command+Z
- Redo the last action on the active Cmap        ctrl+Y        command+Y
- Cut selected Cmap items                        ctrl+X        command+X
- Copy selected Cmap items                       ctrl+C        command+C
- Paste items from the clipboard to the active
  Cmap                                           ctrl+V        command+V
- Delete selected Cmap items                     Delete        Delete
- Select all items on the active Cmap            ctrl+A        command+A
- Add and edit links to resources                ctrl+R        command+R
- Find specific text in the active Cmap          ctrl+F        command+F
- Find the next instance of the text that was
  found previously                               ctrl+G        command+G
- Open the Styles window                         ctrl+T        command+T
- Perform an autolayout on the active Cmap       ctrl+L        command+L
- Hide CmapTools                                               command+H
- Expand a set of selected items                 ctrl+]        command+]
- Shrink a set of selected items                 ctrl+[        command+[
- Create a nested node from selected items       ctrl+B        command+B
If you are having problems installing CmapTools, try the following:
Close all open applications before running the CmapTools installer.
Verify that you have enough disk space before installing Cmaptools. The installer requires 400 MB of disk space to unpack the installer and install CmapTools. After the installation, CmapTools needs 200 MB of disk space. The installer deletes 200 MB of the its work files.
Verify that you are using the correct installer of CmapTools for your Operating System architecture (32 o 64 bits).
CmapTools Installers' Conventional Name
For 32-bits Systems
Win32CmapTools_vx.xx_mm-dd-yy.exe
Linux32CmapTools_vx.xx_mm-dd-yy.bin
For 64-bits Systems
Winx64CmapTools_vx.xx_mm-dd-yy.exe
Linuxx64CmapTools_vx.xx_mm-dd-yy.bin
MacOSXCmapTools_vx.xx_mm-dd-yy.bin
Where:
vx.xx is the CmapTools version
mm-dd-yy is the publishing date
You can download the latest version of CmapTools from here.
Verify that you have permissions to install applications in the selected drive. Otherwise, try to install CmapTools in a personal directory.
If the installer gives errors and/or ends early, you may have a corrupt installer because it is not properly downloaded. Try to download and run the installer again.
If installation fails and the installer freezes or stops working, you must enable some debugging messages to help determine what is wrong:
Only for Windows: The "temp" folder provides workspace for programs. Programs can create temporary files there for their own temporary use. Each program should delete all its temporary files when it closes, but for various reasons it doesn't always happen (for example, if the program crashes, it never gets to do this). If your CmapTools installer doesn't work it is a good idea to delete this temp directory before running the installer again. To delete the contents of the temp directory in Windows, type "cmd" in the Search Windows box and press Enter. After a command console opens, type the commands:
cd %temp%        (change to your temp directory)

**** make sure you are in your temp directory before deleting all the files ****

del /F /Q /S *.* (delete all files that are not in use)
exit             (close the console window)
Where is the folder that CmapTools installs to?
With a "Typical" installation, CmapTools installs to the following default locations:
Where is the folder that CmapServer installs to?
With a "Typical" installation, CmapServer installs to the following default locations:
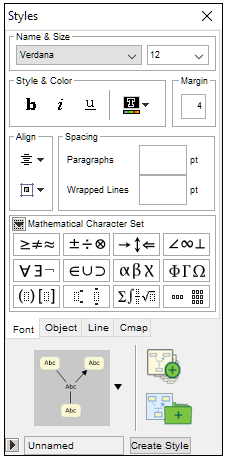
The current version of CmapTools includes a formula editor that is accessible from the drop-down menu: Mathematical Character Set of the Styles palette. The Mathematical Character Set consists of the upper and lower case Greek alphabet, sets and unions, logic, equivalence, and other useful characters. See the attached image.
IHMC CmapTools is written in Java. Compiz and Beryl are compositing window managers for many Linux distributions that use 3D graphics hardware to create fast compositing desktop effect for window management.
So, if Compiz or Beryl are enable and one runs IHMC CmapTools, the Cmap editor window will be blank and it won't be possible to edit a concept map. In other words, CmapTools will open a window with no contents.
If you want to make the changes for all users put:
export AWT_TOOLKIT=MToolkit
at the end of the /etc/profile file. You can do this by opening a terminal and typing:
sudo gedit /etc/profile
If you want to make the changes just one user put:
export AWT_TOOLKIT=MToolkit
at the end of the ".profile" file in the user's home directory. You can do this by opening a terminal and typing:
gedit .profile
I created a folder in a Place (CmapServer) and now CmapTools asks me for a User ID and Password when I try to modify it. What are my User ID and Password?
The first time CmapTools is run on a computer, it displays the following dialogue box (See Image), whereby the user is asked to choose a "User ID" and "Password" that will be used for identification in collaboration and setting permissions.
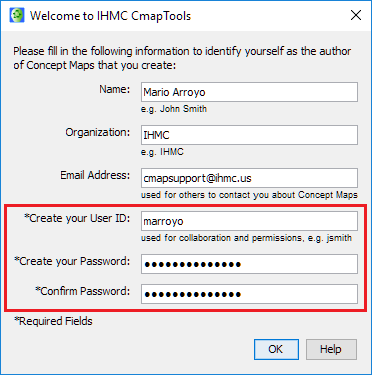
CmapTools remembers this "User ID & Password" combination, and uses it to establish permissions whenever the user creates a folder, whether in My Cmaps or in a Place. That is, the "User ID & Password" combination is set as the "Administrator" of that folder. (On My Cmaps, permissions are not checked since its assume the user has permissions on all folders) As long as the user continues to use CmapTools on that same computer, the program always uses this "User ID & Password" combination when accessing resources in Places. If the user switches to another computer on which CmapTools is already installed, then this installation may have been given a different "User ID & Password" combination the first time it was run. In this case, when accessing his/her folders, the program will present a dialogue box requesting a valid "User ID & Password" combination. The same would happen if the user switches to another computer and, when he/she first runs the program, provides a different "User ID & Password" combination.
So, when CmapTools presents the dialogue box requesting the "User ID & Password" in order to perform the requested operation, you must provide a "User ID & Password" combination that has the required permissions. (Depending on what permissions are set on the folder that contains the resource on which the operation is requested, selecting the Properties menu entry for the folder where the resource is located, and then clicking on the Permissions button of the dialogue box displayed may show the list of "User IDs" with permissions on that folder, but will not show the Passwords. This may help you remember what the "User ID & Password" combination might be). If you don't remember the "User ID & Password" combination, the administrator for the Place (CmapServer) will be able to change the Password, but not retrieve it. Once you have provided a valid "User ID & Password" combination, the program will remember the combination and will attempt to use it in further operations. This way, as the user accesses various folders that require different "User ID & Password" combination, the program remembers them all and attempts to use them when accessing the same, or other folders.
The user's default "User ID & Password" can be changed in the "User Info" tab, after selecting the menu entry "Edit/Preferences" in the Views window.
For detailed information on User IDs, Passwords, and Permissions under CmapTools, check the Cmap "User IDs + Password in CmapTools" or refer to the white paper "Permissions and Access Control in CmapTools".
I do not have access to a shared Place (CmapServer), can I transfer a Cmap from one computer to another one?
If you don't have access to a shared IHMC CmapServer, you can still transfer Cmaps "manually" between computers.
Make sure CmapTools is not running.
Make sure that the Cmap you want to transfer is on "My Cmaps" (if you are going to transfer more than one Cmap and/or resources, place them all within the same folder and perform the same operations described here with that folder).
Drag-and-drop the Cmap (or entire folder) from "My Cmaps" to the desktop or to a local file system window (e.g. Windows Explorer, Mac Finder, etc.).
Copy the Cmap (or folder) to the desktop or file system window of the target computer (using an external drive, through a network connection, send it as an email attachment, etc.). Note that you can drag-and-drop a Cmap directly from the Views to a mail client to send it as an attachment.
Run IHMC CmapTools on the target computer.
Drag-and-drop the Cmap (or folder) to "My Cmaps".
Note: drag-and-drop from a Place (CmapServer) to the desktop or local file system is not allowed because of some restrictions of the operating systems; so you need to first copy the resources from the server (place) to "My Cmaps" and then from "My Cmaps" to the desktop. Drag-and-drop from the desktop or local file system to a Place is allowed.
The Search function does not work for resources in "My Cmaps". It does not return results, although I know I have resources related to the keyword used in the search. How do I search for resources in "My Cmap"?
The problem is related to the corruption of the "My Cmaps" index file . So, the index needs to be created again. Follow these instructions:
Quit CmapTools.
Go to the "CmapTools" profile folder.
Windows
Mac OS X
Linux
Delete the folder titled "local". This is the directory where the index is stored.
Restart IHMC CmapTools.
Since the index is not present (the "local" folder under CmapTools has been deleted), CmapTools will recreate it. It should take a couple of minutes, depending on how many resources you have, and you'll notice your disk chattering from all the access.
I am running CmapTools on Kubuntu, and when I either double-click a URL resource or click the "View as Web Page" button on an open Cmap stored in a Place, Firefox will open two instances of the URL and Konqueror also opens an instance. Is this a bug in CmapTools?
No, it has to do with some unused devices that are being used in the "xorg.conf" file on your machine. To correct the problem, please try the following (***Note: Incorrectly modifying the "xorg.conf" file can lead to failure of the GUI to boot at all, so if you are uncertain please consult with an experienced Linux admin before attempting these steps!):
Open a terminal and 'CD' to /etc/X11/
Make a backup of the file by typing:
cp xorg.conf xorg.old
Use the "sudo" command to open the xorg.conf file with your favorite text editor (i.e. "sudo kate xorg.conf"). When prompted, supply the password you normally use to login to the account currently being used.
From the open file, do the following:
Take out the Sections for the Wacom Erasor, Cursor, and stylus in the "inputDevice" section. Then in the "Serverlayout" Section near the bottom erase the following three lines:
InputDevice "stylus" "SendCoreEvents"Put the "SendCoreEvents" part after your primary mouse pointer definition, if you want or need it.
Save and exit the xorg.conf file back into its original location:
/etc/X11/xorg.conf
Either restart X or reboot your machine for the changes to take effect.
Now when you double-click a URL resource or open the Web version of a Cmap stored in a Place using the "View as Web Page" button, it should open only one instance of the URL in the browser specified first in the cmaptools.cfg for the parameter "nlk.resourceViewer.externalViewer.linuxAppList=".
When I attempt to install CmapTools in Windows I receive the following message: "Installer User Interface Mode Not Supported, Unable to load and to prepare the installer in GUI mode". After this message is displayed, installation terminates.
This error message appears when the Windows user name contains "strange" characters like !, ¡, or #. A simple workaround is as follows:
Open the Control Panel, double click on "User Accounts", and Create a new user (i.e. "temp").
Login as this new user ("temp" in our example) and install CmapTools; be sure to choose "Create Icons For all users" in the "Choose Shortcut Folder" step.
Relogin as the user with the strange characters and use CmapTools.
Then, the temporary user ("temp" in our example) user can be deleted; however in order to uninstall CmapTools, you will have to recreate the "temp" user.
The first time CmapTools is ran, the information that identifies the user is requested. This information is used in the creation and access of cmaps, folders, and resources. This information together with configuration parameters and user preferences creates the CmapTools User Profile. This information is in the "profile.xml" file.
The profile.xml file is a text file in XML format with no particular rules. It can be edited with any text editor.
*** Important ***It is strongly recommended not to manually modify this file as any error can cause the application not to properly work.
It is best to use the menu option: Edit -> Preferences and make any changes to the user's information or any other preference.
Any reference to an access path is interpreted according to the operating system you are running. For example, if you change the path of the "My Cmaps" directory, you must do it as it is done in your operating system (e.g. use the correct file separators: "\" or "/" symbols according to your operating system).
The CmapTools User Profile is in:
If you are using an internal or external monitor with Ultra High Definition (4k UHD) using a higher resolution than 1,920 by 1,080 pixels up to 3,840 by 2,160 pixels, you might experience the following problems in CmapTools:
This scale problem can be fixed from the application or from the operating system. CmapTools is written in Java, and Java fixed the scale problem in the version 9, but CmapTools is not converted to Java 9 yet.
If you lower the resolution of your monitor to at least 1920 x 1080, CmapTools will run normally, but doing this is not using the monitor at its maximum capacity and all applications could look larger.
Latest Windows 10 release seems to solve the problem for some users. You can also change the Java compatibility properties to override display scaling behavior. If you have the problem, try to update windows 10 first and run CmapTools again. If you continue to see the very small CmapTools components, try step 2 below.
Windows 10 version 1709 (Fall Creators Update) includes better support for Ultra High Definition monitors. To verify the version number of your Windows type: Winver on the search box on your taskbar. To check Windows 10 updates, see the Windows 10 Update History.
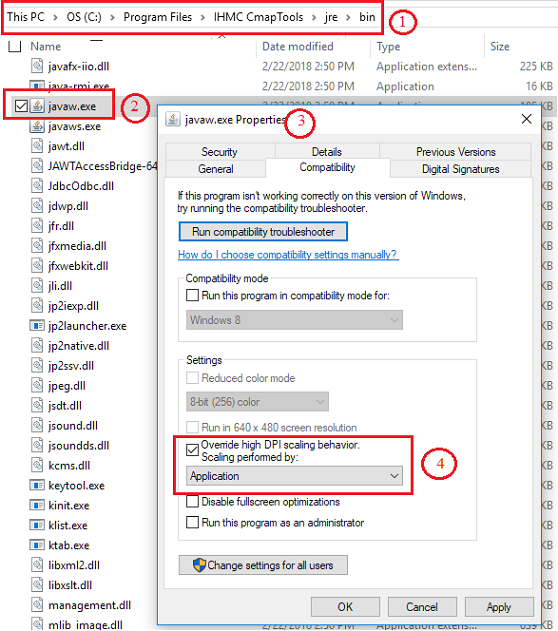
Open Windows Explorer and navigate to the folder where you installed CmapTools. Typically is on c:\Program Files\IHMC CmapTools. Open the folder c:\Program Files\IHMC CmapTools\jre\bin (1). Do a right-click on the file: javaw.exe (2), select Properties, select the Compatibility tab (3), and then select the Disable display scaling on high DPI settings check box.
Note
In Windows 10 Version 1703 and later version of Windows, the text of the Disable display scaling on high DPI settings option is changed to Override high DPI scaling behavior, scaling performed by: Application. (4)
The CmapTools Ontology Editor (COE) isn't part of the CmapTools Support Forum anymore. We no longer answer questions about COE on this forum.
If you want more information about this project. Please visit: CmapTools Ontology Editor (COE).
CmapLite was a version of CmapTools with reduced memory requirements built to run on Notebooks that were popular several years ago, particularly in schools. All new computers have enough memory to run the full version of CmapTools so we have stopped making new versions of CmapLite.