The CmapServer enables users anywhere on the Internet to collaborate during the construction of their Cmaps, share the knowledge models they build, browse, critique and comment on others’ Cmaps. The CmapServer acts as a shared repository for Knowledge Models, Knowledge Soups, an index for searching for Cmaps and resources, enables collaboration through Discussion Threads and Synchronous Collaboration during Cmap editing, and automatically provides Web-page versions of the concept maps. Concept maps in a CmapServer can have links to Cmaps and other types of resources on other CmapServers.
For more information, see the Cmap: “What is the CmapServer in the CmapTools network?”.
To run a CmapServer you need:
The computer where the CmapServer will be installed should have a fixed IP address. The CmapServer may not run properly in a machine that is configured to use DHCP. If the machine where you installed the CmapServer has multiple network interfaces, you should select the IP address and the host name that you want the CmapServer to register in the Directory of Places, and set them in the CmapServer configuration file (serverconfig.txt) by editing the values for the "server.ip.address=" and "server.hostname=" variables.
The machine should be registered in a Domain Name System (DNS) with the reverse lookup option activated. If the machine is not registered in a DNS, the access to the CmapServer from CmapTools clients may be extremely slow.
The CmapServer has an embedded web server that allows access to the web page versions (HTML) of the concept maps. This web server runs on port 80 by default and therefore the CmapServer should be installed and run from a "root" account (Unix, Linux, Mac OS X) or Administrator (Windows, Mac OS X). If you are not able to run the CmapServer as "root", you have to change the web server port to be greater than 1024. If you have another web server running in the computer (i.e. Apache, IIS) in port 80, then you should set up a different port for the embedded web server by editing the value of the "webserver.port=" variable in the CmapServer configuration file (serverconfig.txt). We suggest that you use port 8001 or 8080 instead of port 80.
The web page version of the CmapServer can be accessed from any web browser and its syntax is http://<hostname>:<port>. If the web server is running in port 80, then you don't have to include it in the URL. These are examples of public servers:
If you have a firewall, then you have to open some ports in order to allow the CmapServer to communicate with CmapTools clients and other servers such the Directory of Places. The ports to be opened are:
A detailed information about the CmapTools Network Architecture is available in the CmapServer-Documentation section located in "Documentation and Support".
For a better identification of your CmapServer, use the name of your organization and the name of your country in parentheses as the server name. Some examples:
The CmapServer is distributed for 32-bit and 64-bit operating systems. You can download the CmapServer installer according with your system architecture.
On Windows Vista and newer Windows versions, to find out if your computer is running a 32-bit or 64-bit version of Windows, do the following: Open the System control panel by clicking on the Start button, right clicking on "Computer", and then clicking on "Properties". Under System, you can view the system type. Or you can run the command: "wmic os get osarchitecture", which will display the architecture type.
If you don't know whether your Linux distribution is 32-bit or 64-bit, open a Terminal or shell window and type the command "arch". The "arch" command displays whether the system is 32-bit ("i686") or 64-bit (""x86-64").
Under OS X, there is no 32-bit version of the OS, therefore there is only one installer.
For 32-bits Systems
WinCmapServer_vx.xx_mm-dd-yy.exe
LinuxCmapServer_vx.xx_mm-dd-yy.bin
For 64-bits Systems
Winx64CmapServer_vx.xx_mm-dd-yy.exe
Linuxx64CmapServer_vx.xx_mm-dd-yy.bin
MacOSXCmapServer_vx.xx_mm-dd-yy.bin
Where:
vx.xx CmapServer version
mm-dd-yy Publishing date
You can download the latest version here.
CmapServer installers can run in three different modes:
Graphic Mode is supported in all platforms with a graphical windowing environment.
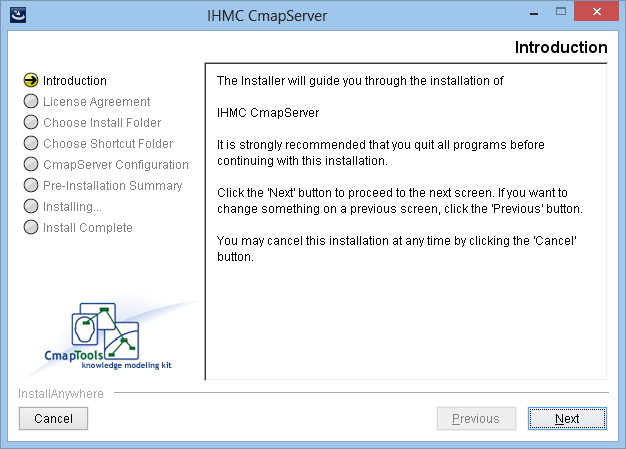
To run the installer in Graphic Mode double-click on the installation file that was downloaded.
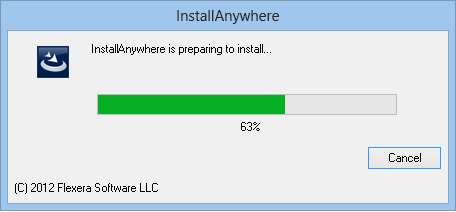
The installer unpacks and installs the Java Runtime used only for the installation and to run the CmapServer in your computer. As it launches, you will see this message:
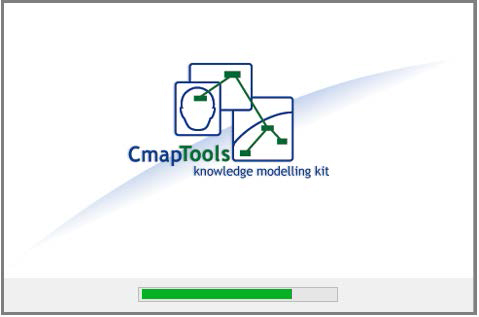
After the program is loaded you will see the splash screen as shown here:
The next screen presents information about the navigation keys, and the way
to cancel the installation at any time:
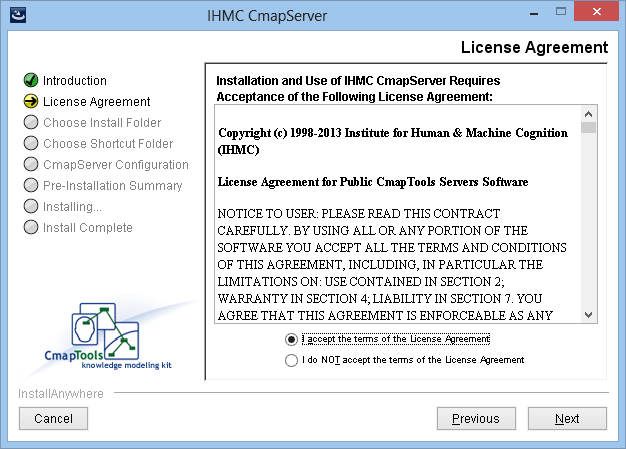
You should read, and accept the terms of the license agreement to continue
with the installation:
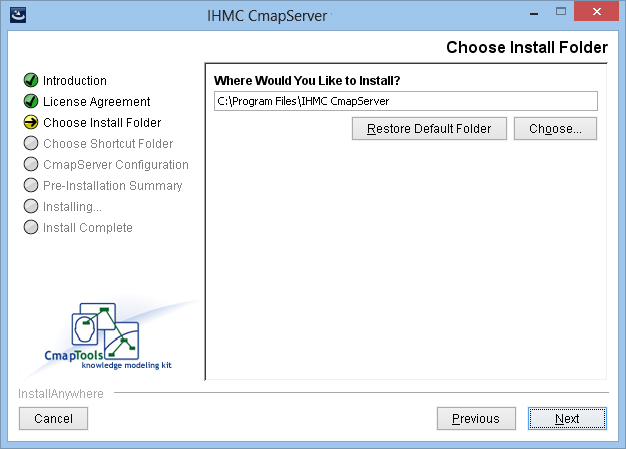
You must select a folder to install the CmapServer, the default folders are:
Under Windows: C:\Program Files\IHMC CmapServer
Under Mac OS X: /Applications/IHMC CmapServer
Under Linux: /home/<user_name>/IHMC_CmapServer
You can select any other folder to install the CmapServer by specifying the pathname of the folder or selecting it from the file browser by pressing the “Choose” button.
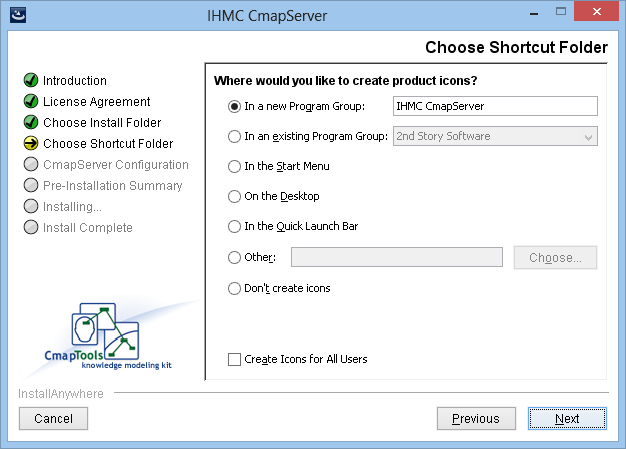
You have the option of specifying a location to create a shortcut (in Windows), an alias (in Mac) or a link (in Linux) to launch the CmapServer once the installation
process is completed.
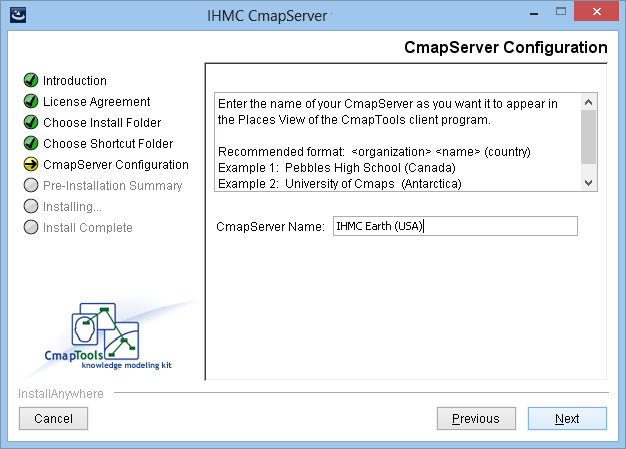
The CmapServer’s name is used to identify your server (Place) in the “Places View” of the CmapTools clients. For a better identification of your CmapServer, we recommend you use the name of your organization followed by your country in parentheses.
Next you need to provide ther User ID and Password for the CmapServer's administrator. The administrator’s User ID and Password for the CmapServer are used to:
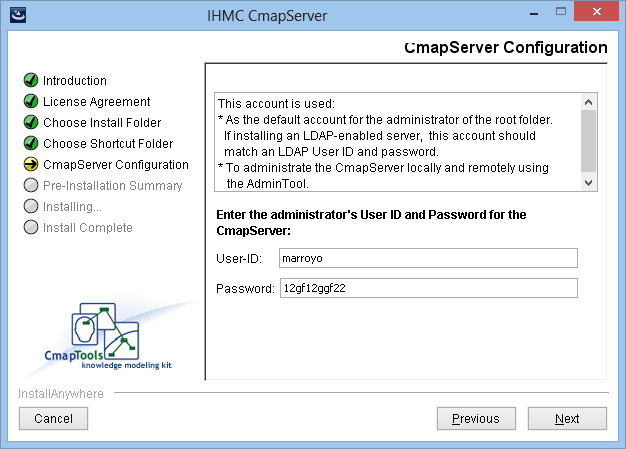
Once the server is launched, all the passwords in the configuration file (serverconfig.txt) will be encrypted.
For more information about replacing a password in the configuration file, see: “How to Replace an Encrypted Password”.
Next enter the port number through which the CmapServer will communicate with the CmapTools clients. The default port number is 4447. IHMC public servers have been changed to use port 443.

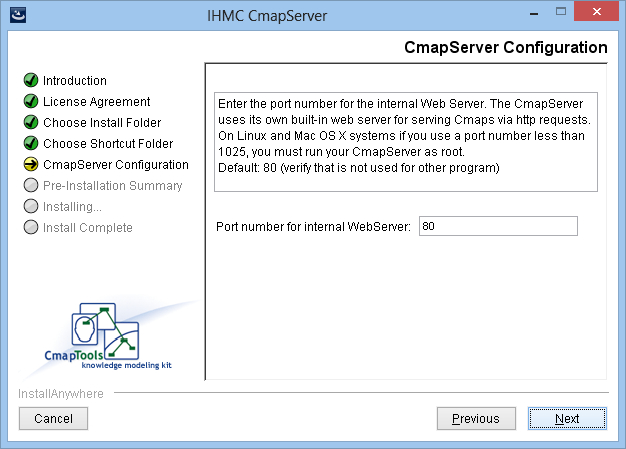
Next enter the port number of the internal web server.
Under non-Windows systems, it may be necessary to change the value of this port to a number above 1024 if the server cannot run with administrative privileges (usually the 'root' account).
To read additional information regarding the internal web server on CmapServer, see: “CmapTools, Web Pages & Websites”.
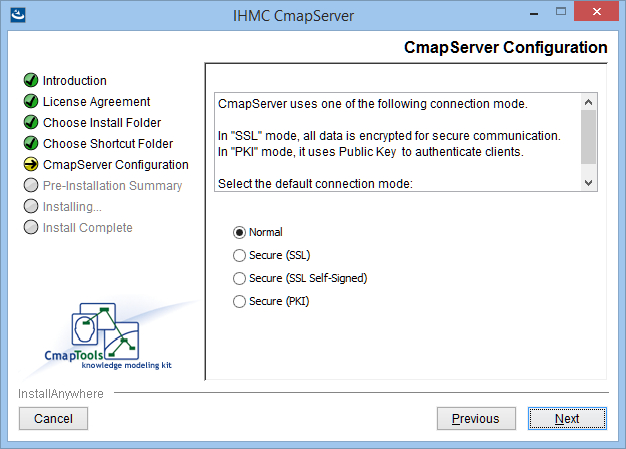
The communication mode provides the option of establishing a secure communication between the he communication mode provides the option of establishing a secure communication between the CmapServer and the CmapTools clients. The options for secure communications available are SSL and PKI. The "Normal" connection mode does not provide a secure communication.
If you select “Normal” connection mode, the installation program continues to the next step in the installation. No secure communication will be used.
The SSL (Secure Sockets Layer) protocol creates a secure connection between CmapTools clients and the CmapServer. It uses X.509 certificates and hence asymmetric cryptography to assure the counterparty whom they are talking with, and to exchange a symmetric key.
If you select "Secure (SSL)" connection mode, the installation program continues with the SSL Settings.
If you select "Secure (SSL Self-Signed)" connection mode, the installation program continues to the next step in the configuration.
The PKI (Public Key Infrastructure) protocol creates a secure connection between CmapTools and the CmapServer. It uses a public and a private cryptographic key pair that is obtained and shared through a trusted authority.
If you select “Secure (PKI)” connection mode, the installation program continues with the PKI Settings.
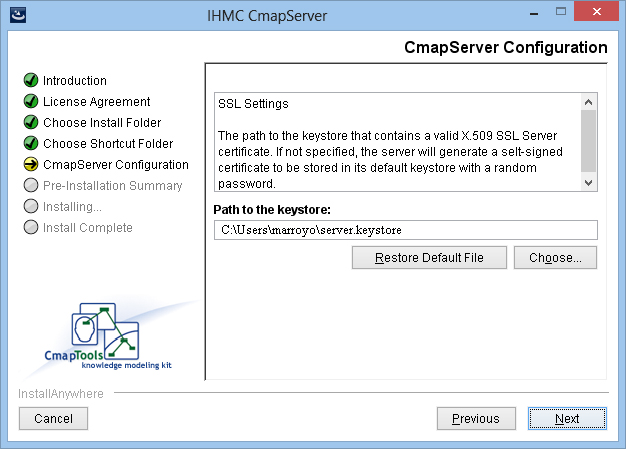
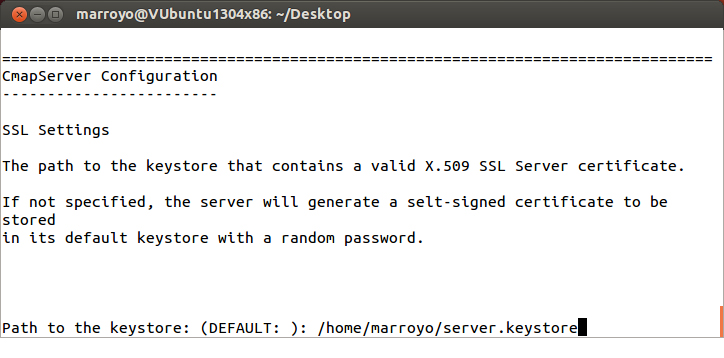
Enter the path to the keystore that contains a valid X.509 SSL server certificate. If not specified, the server will generate a self-signed certificate to be stored in its default keystore with a random password.
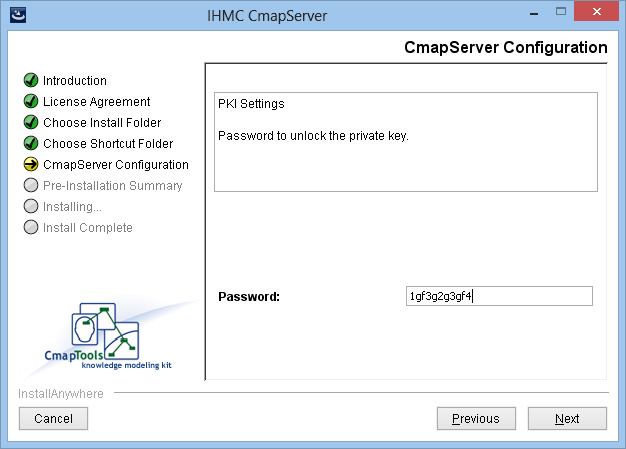
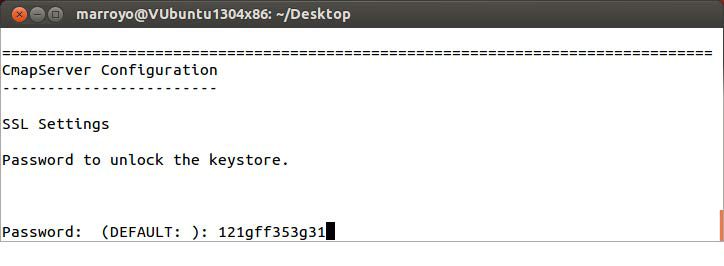
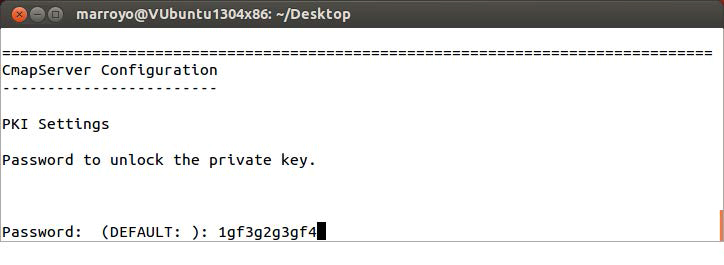
Next specify the password to unlock the private key.

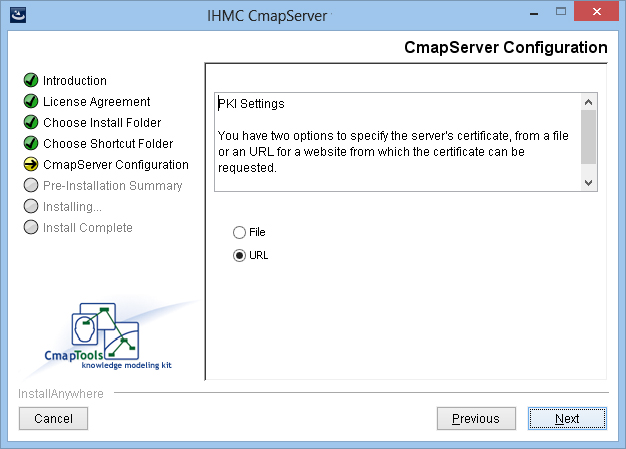
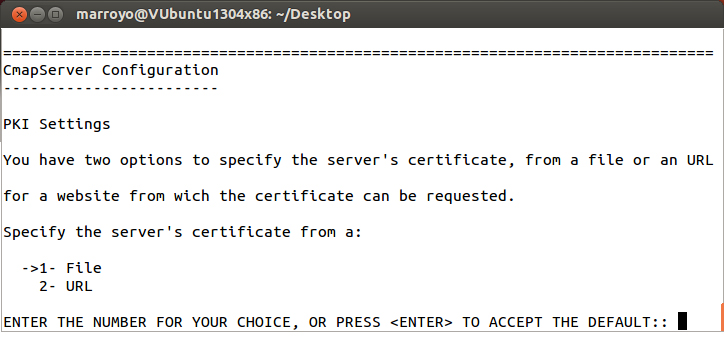
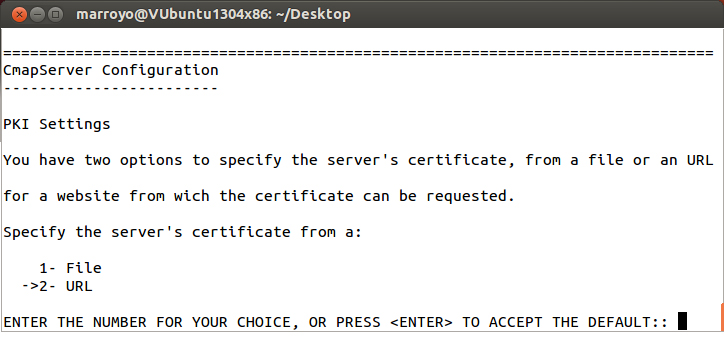
You have two options to specify the server’s certificate:

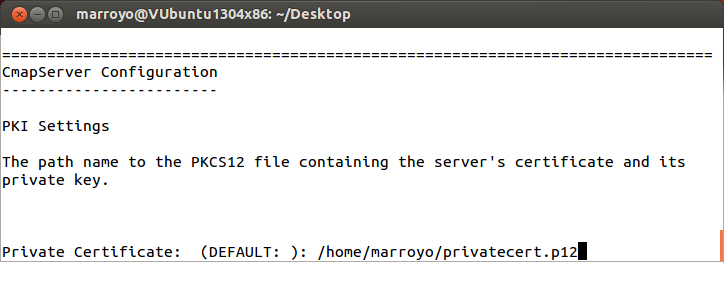
If you select to uses a file, enter the path name to the PKCS12 file containing the server's certificate:
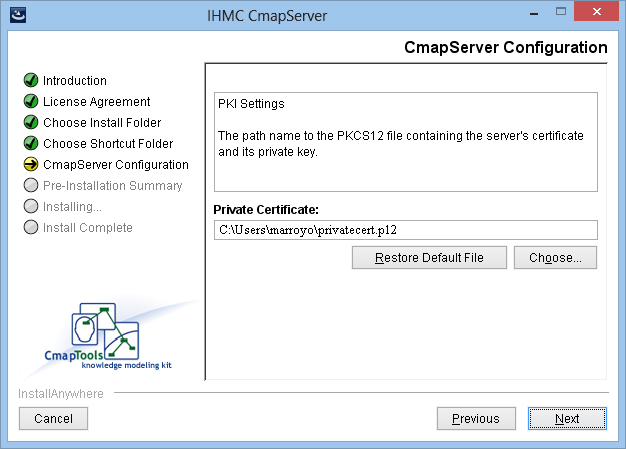
...and its private key:
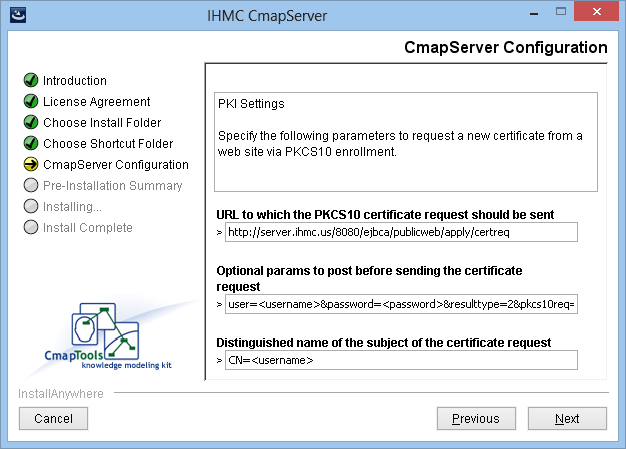
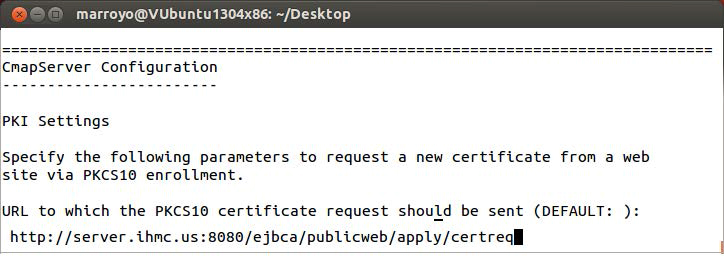
If you select to uses a URL:
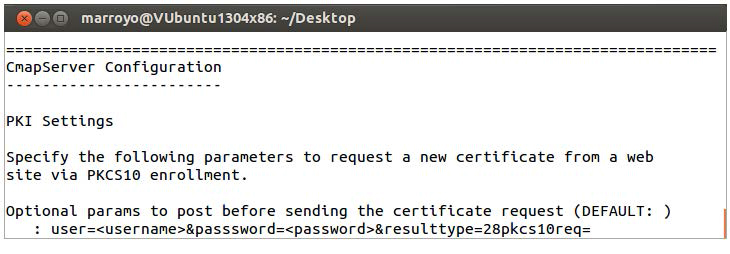
The parameters to request a new certificate from a website via PKCS10 enrollment are:
If set, the server will try to request a new certificate from the CA, otherwise, it will use the keystore file specified by pki.keystore.
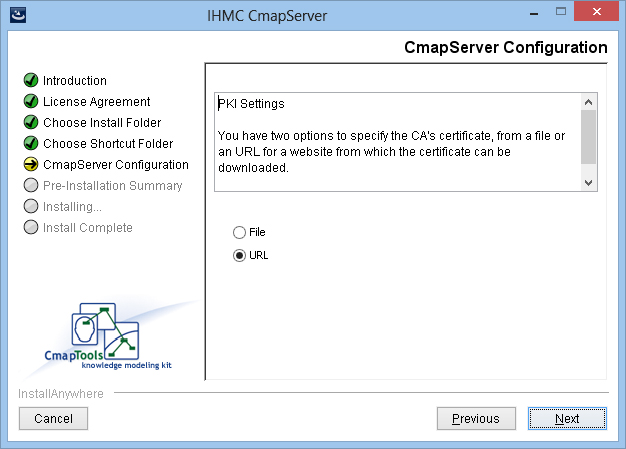
There are two options to specify the CA’s certificate:
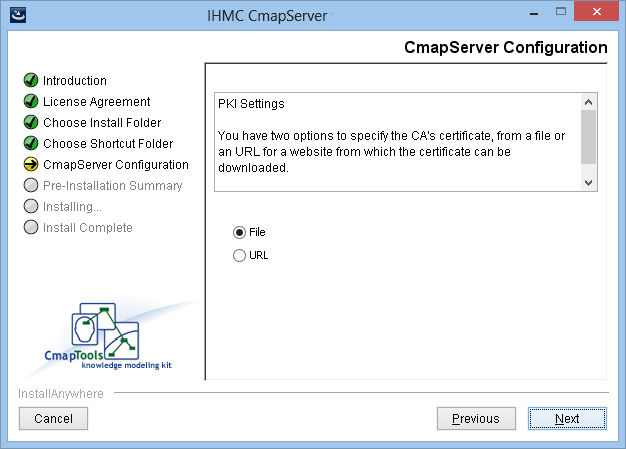
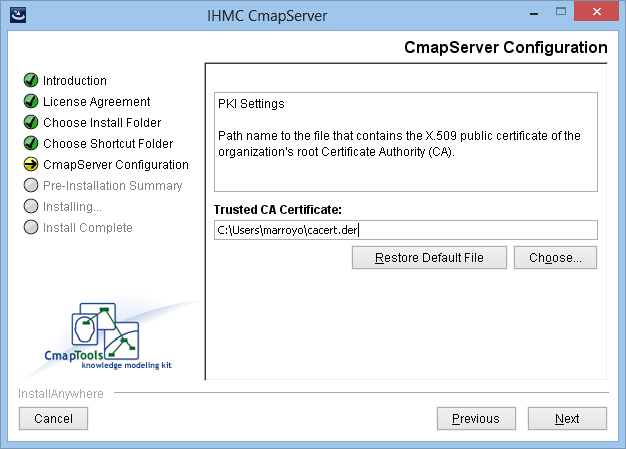
If you select File, enter the path name to the X.509 file containing the CA trusted certificate:
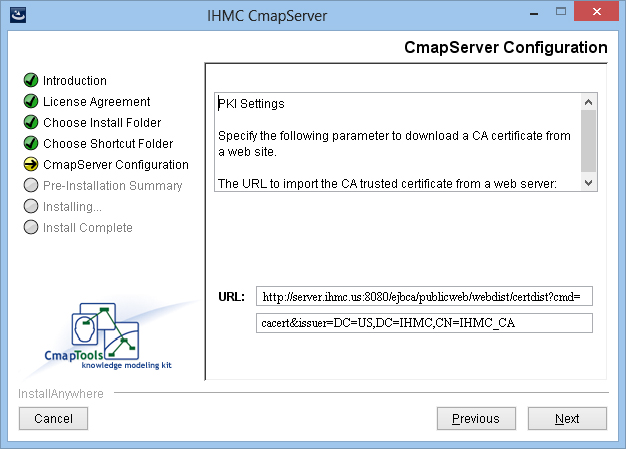
If you select to uses a URL:
Enter the URL to import the CA trusted certificate from a web server. If set, the
server will try to download the CA trusted certificate from the given URL, otherwise, it will use the certificate file specified by pki.ca.certificate.
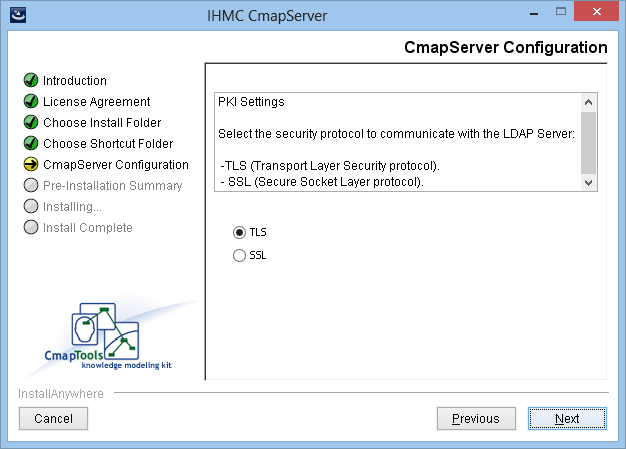
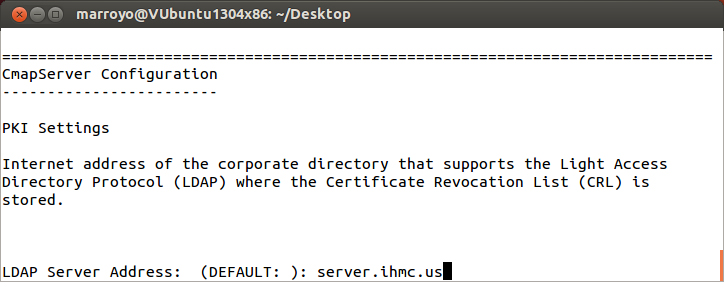
Next enter the hostname of the LDAP server to retrieve Certificate Revocation Lists (CRLs). This value is optional. If no LDAP host is specified, no certificate revocation checking will be performed.
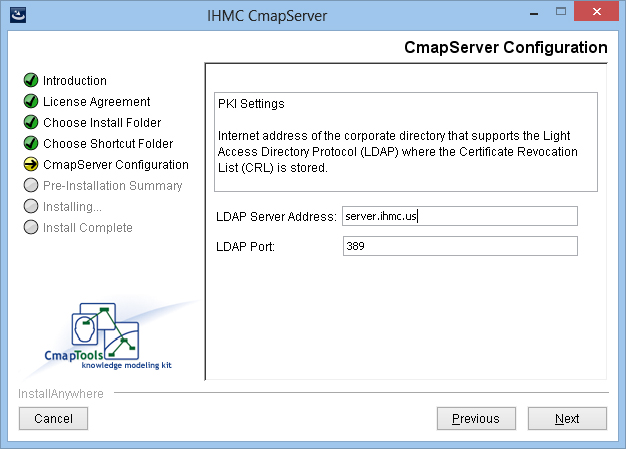
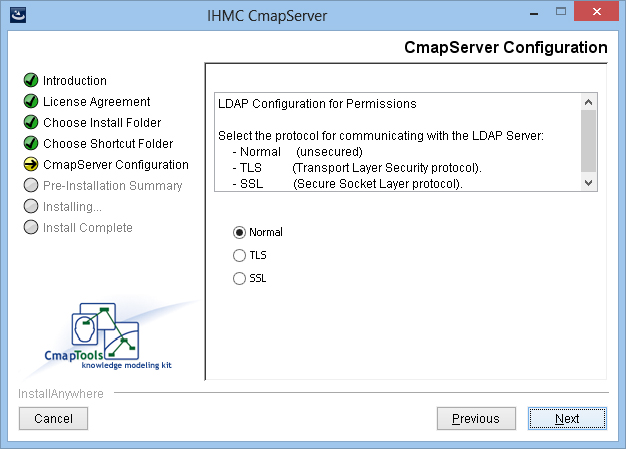
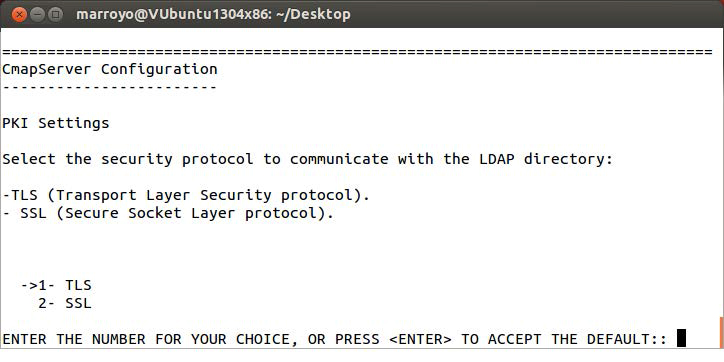
Next you need to select which security protocol is used to contact the LDAP server. Two security protocols are supported: TLS and SSL.
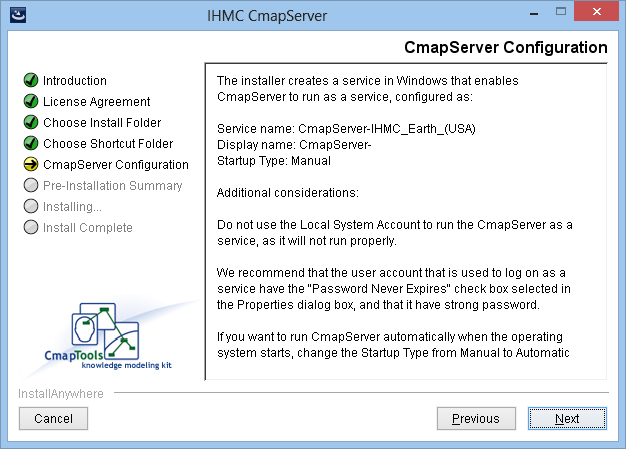
If the CmapServer is being installed on a Windows machine, the installation program creates a Windows service that lets you run CmapServer as a service, so you can run the CmapServer automatically each time you start the computer. To run the CmapServer as a service under OS X or Linux please see the section "Run CmapServer as a Service" in this manual.
The Service Name is created using the prefix "CmapServer-" followed by the CmapServer name given during installation; the spaces are replaced with underscores.
Service name: CmapServer-IHMC_Earth_(USA)
The Display Name is created using the prefix “CmapServer-“ and the CmapServer port number given during installation.
Display Name: CmapServer-4447
The Startup Type is set by default to be"manual"; if you want to launch the CmapServer when the operating system starts, change the Startup Type from Manual to Automatic.
Don't use the Local System Account to run the CmapServer as a service, it will not run properly. We recommend that the user account used to run CmapServer as a service have: "Password never expires" and a strong password.
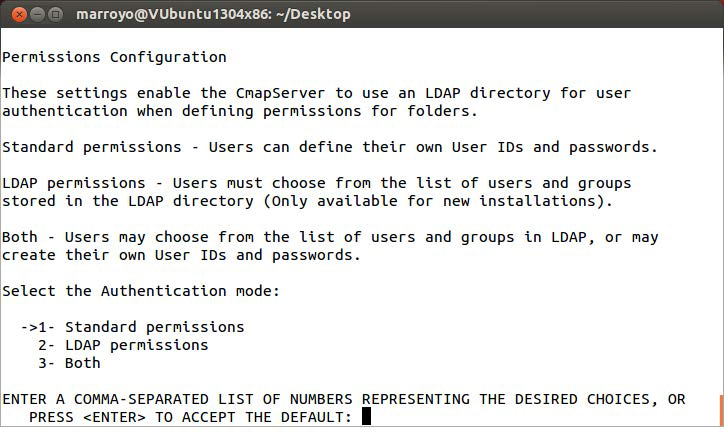
The CmapServer supports three authentication modes:
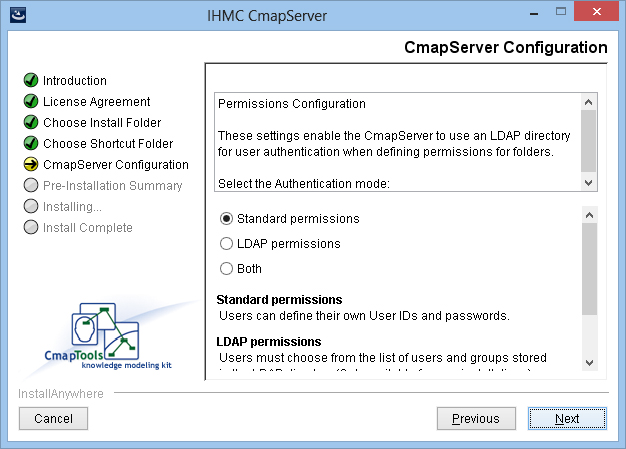
Your selection defines the entry “user.authentication” in the CmapServer configuration file to be one of the following:
If this entry is missing or blank, then standard permissions are assumed.
For more information on how to configure LDAP with CmapServer and use LDAP permissions in CmapTools, please see “Managing Users and Permissions Through LDAP”.
If you select standard authentication, the installation program continues to the section on “Email Configuration”.
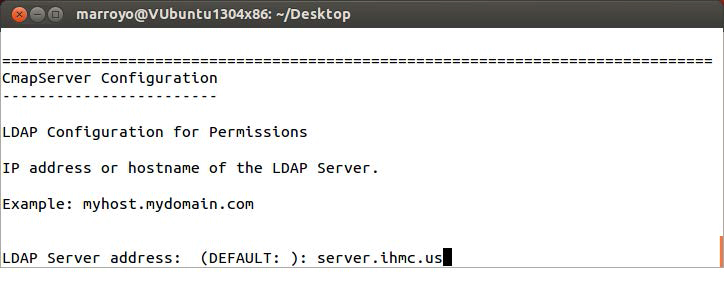
In the next step, the address and port number of the LDAP server are entered.
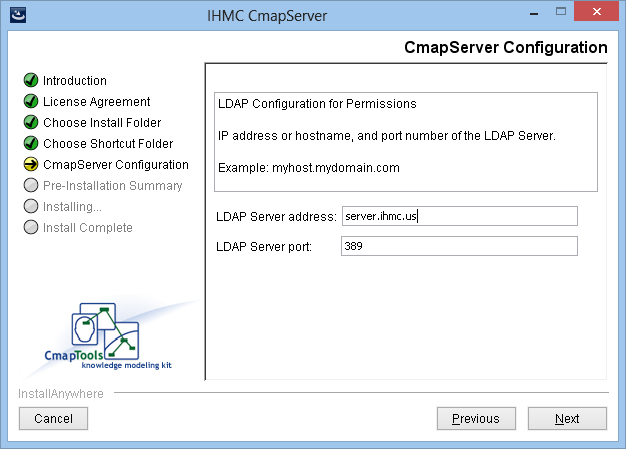
Then, the protocol for communicating with the LDAP server must be selected. Three modes are supported: Normal (unsecure), TLS (Transport Layer Security), and SSL (Secure Socket Layer).
If a secure mode is selected, the PKI authentication settings will be used if they have been specified. Otherwise, the CmapServer will establish a secure LDAP connection without PKI authentication.
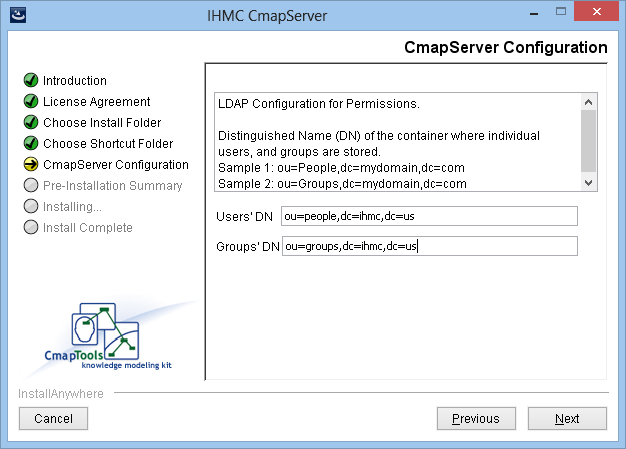
The following step requests the Distinguished Name (DN) of the LDAP containers where individuals and groups are stored.
These containers will be searched with ‘subtree’ scope to determine the list of users and groups shown to the CmapTools client. Both static and dynamic (or role-based) groups are supported.
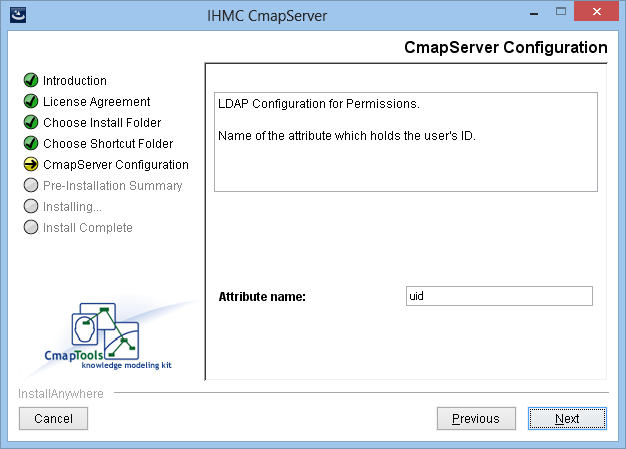
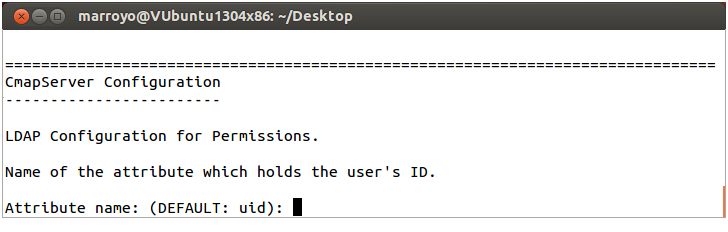
The next step asks for the name of the LDAP attribute which holds the user’s ID. The value of this attribute will correspond to the notion of “User ID” in the CmapTools client. For example, “uid” is a commonly used attribute for this purpose.
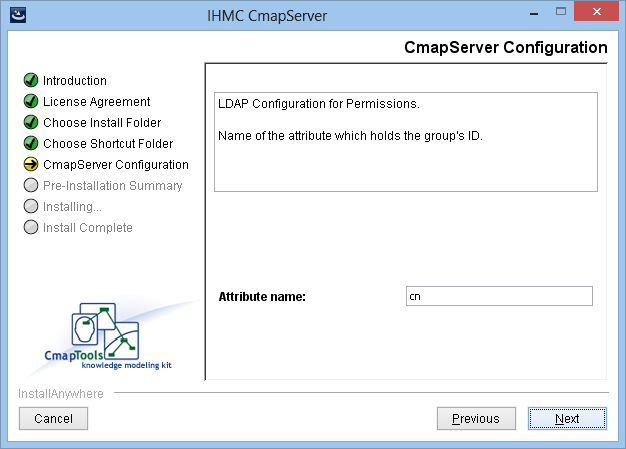
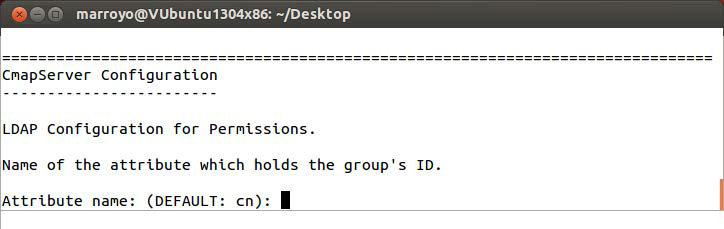
The next step asks for the name of the LDAP attribute which holds the group’s ID. The value of this attribute will again correspond to the “User ID” in the CmapTools client. In most cases, the attribute “cn” is appropriate for this case.
Please note that the LDAP server must be installed and launched separate from the CmapServer. Although the CmapServer has an embedded Web server, it does not inculude an LDAP server.
The CmapServer is capable of sending three types of email messages:
Status messages, usually sent to the CmapServer's administrator(s).
Examples of notification messages sent by the CmapServer are:
The CmapServer has successfully launched and is now servicing clients.
The CmapServer attempted to launch but failed.
The CmapServer has detected a severe error and must shutdown.
The CmapServer has shutdown (normal shutdown).
Discussion threads messages.
CmapTools users participating in a discussion thread can request to be notified if a new discussion thread message has been posted to that thread.
Request for a forgotten account and password.
If the CmapServer is using Normal permissions, and the user has forgotten a password for a folder, the user can request that the password be sent to the email address stored with the corresponding user ID.
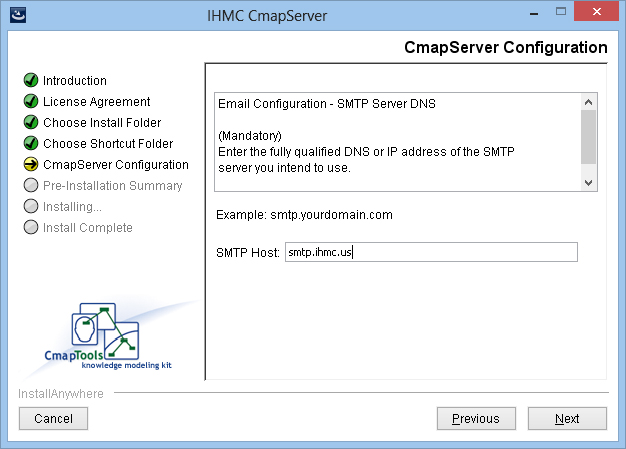
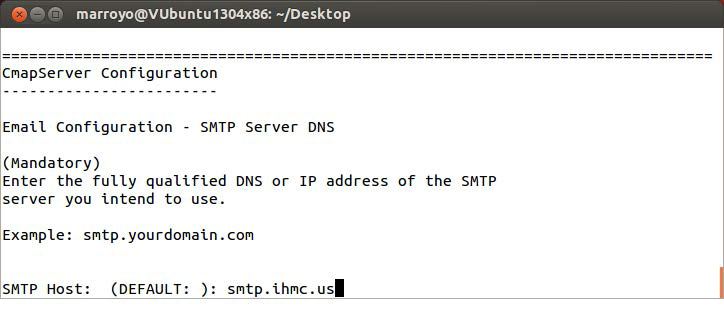
The Cmapserver must be configured with the entries necessary to communicate with a your SMTP server. This begins with entering the DNS or IP address of the SMTP server to which the CmapServer should connect.
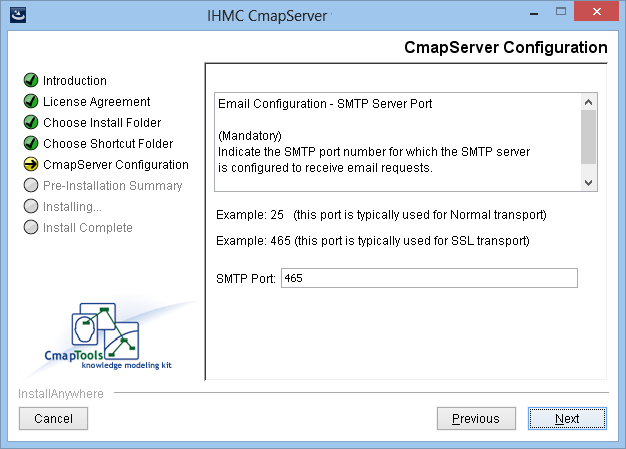
Next, enter the SMTP port number on which the CmapServer should connect to the SMTP server.
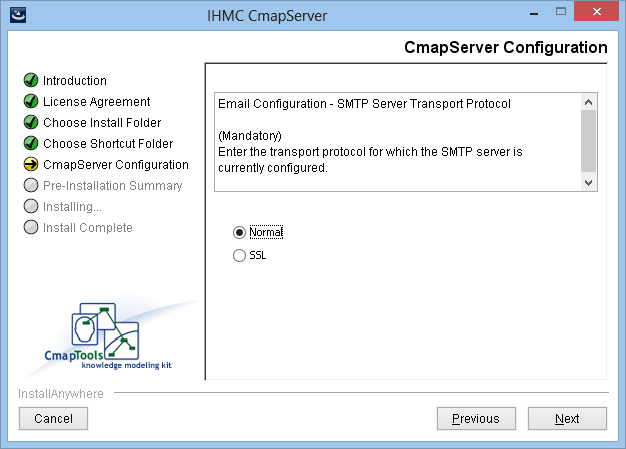
Enter the transport protocol specified by the SMTP server. The allowed values are Normal and SSL.
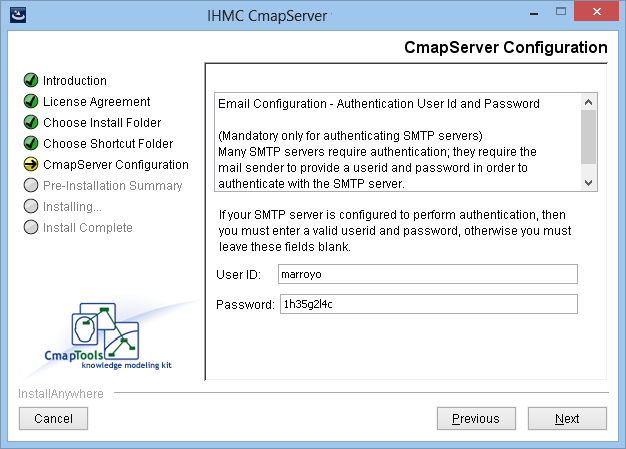
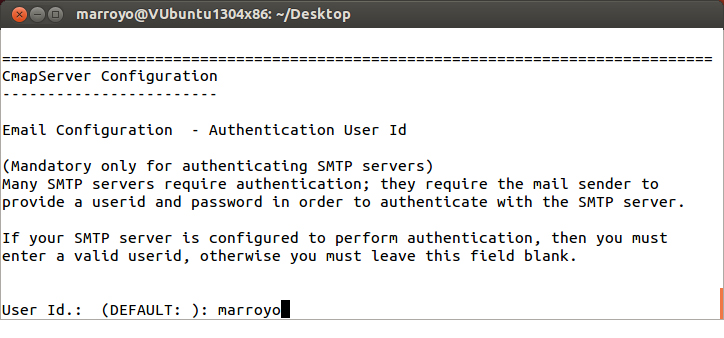
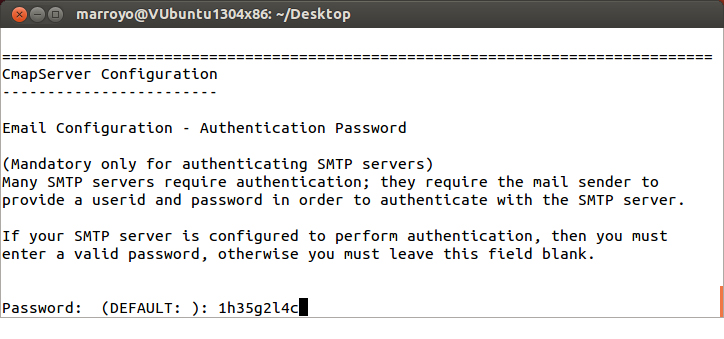
Enter the user id and password to be used to authenticate with the SMTP server.
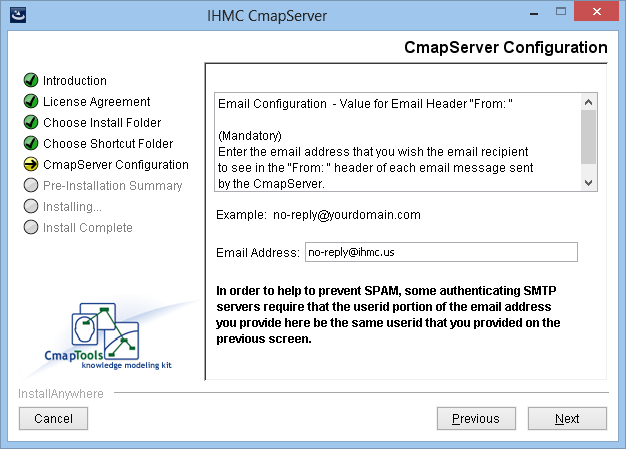
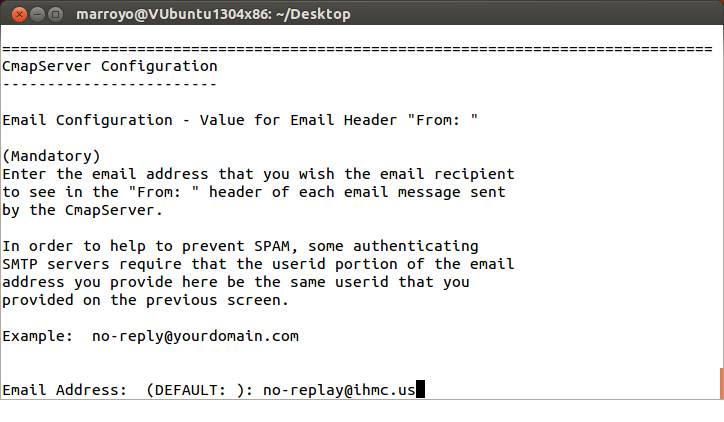
Enter the email address to be used in the “From:” header of all emails sent by the CmapServer:
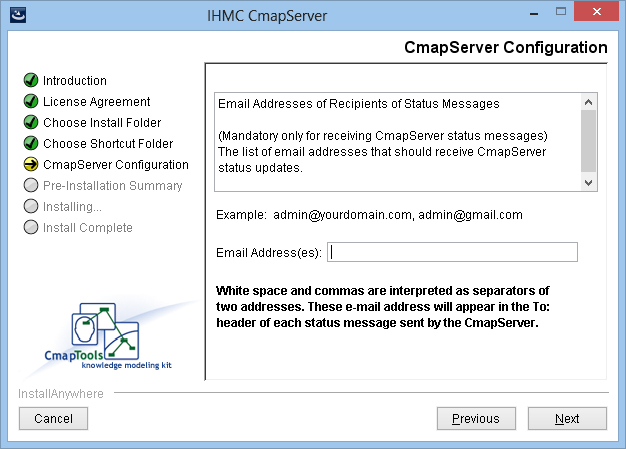
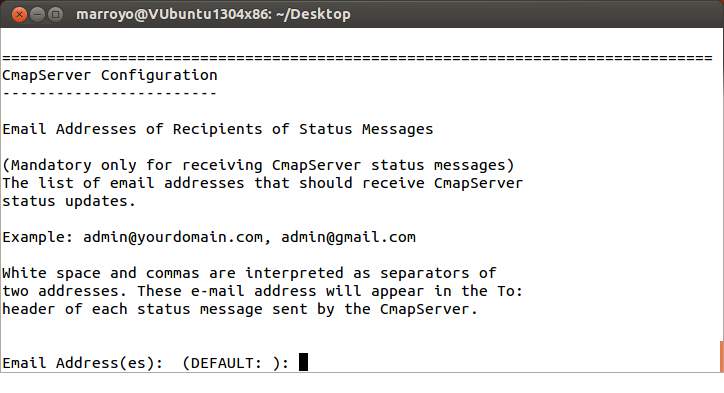
Next, enter the list of email addresses that should receive CmapServer status notifications. White space and commas are interpreted as separators.
These email addresses will appear in the “To:” header of each status message sent by the CmapServer.
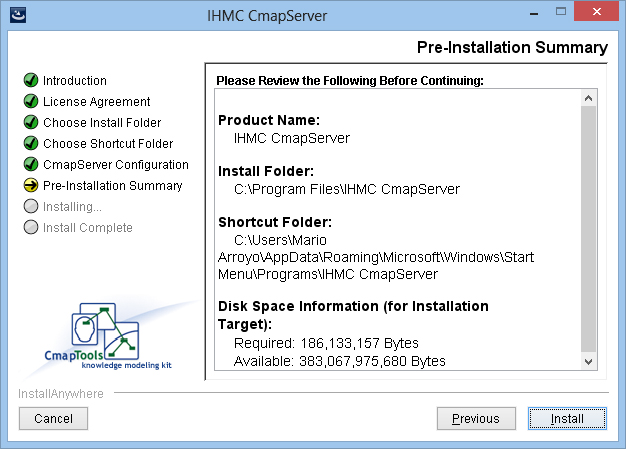
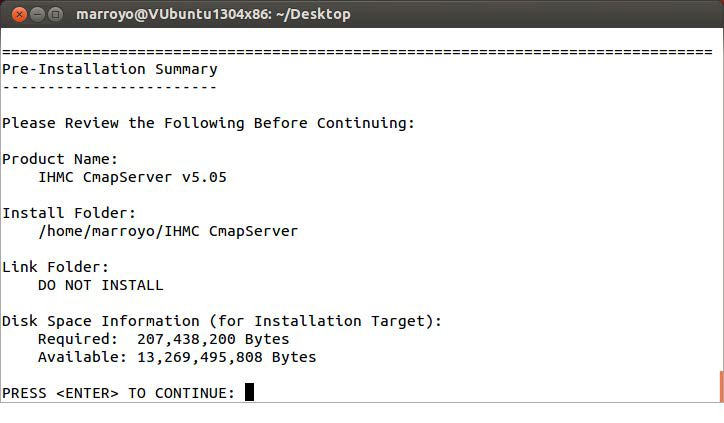
The configuration of the CmapServer is complete. You are presented with a summary of the configuration entries. Verify this information and press “install” button to continue with the installation process.
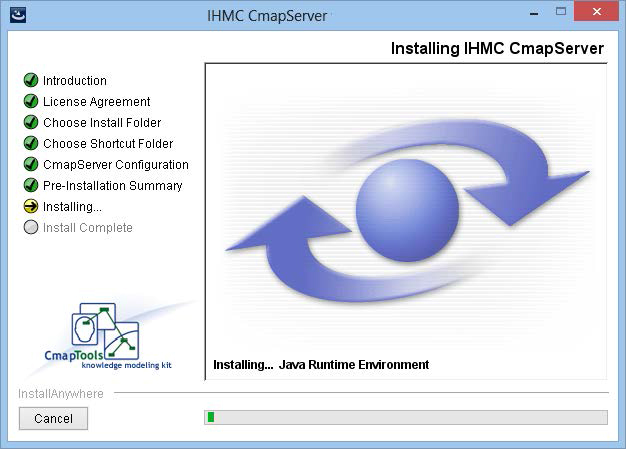
When the installation begins, you will see this progress screen:
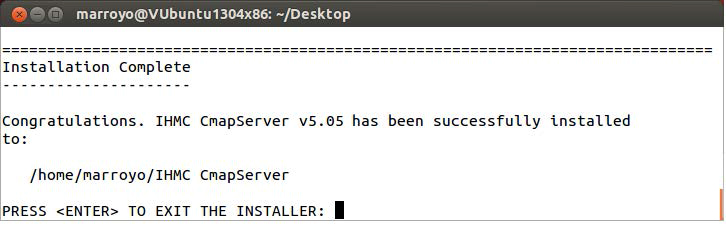
The installation has completed. Click on Done to exit.
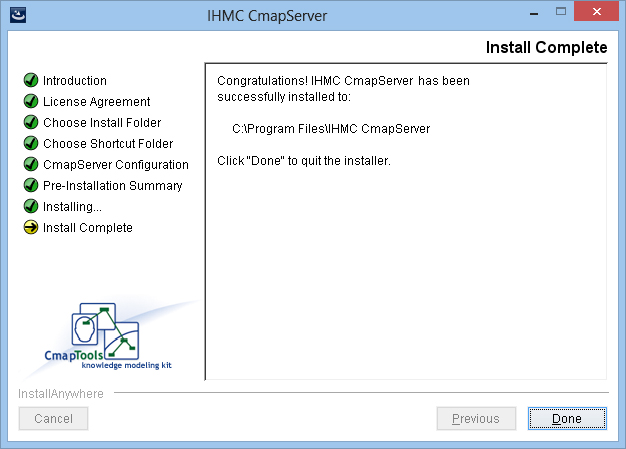
The installer creates a log file of the installation process, please check the summary section of this file to verify the status of your installation.
For more information about this file, please see “The Installation Log File”.
Console Mode, also known as Command Line Interface, is convenient for remote installations over internet, or to install on systems without a graphical windowing environment.
Console mode mimics the default GUI steps provided by Graphic Mode, and uses standard input and output. The biggest advantage to console mode is that Linux users don't need to run X-windows (X11) to run the installer. We will show here how to run the installer in console mode for Linux.
Note:
Console mode installation of CmapTools is not supported under Windows.
Console mode displays output text on the console line-by-line. It does not allow for any formatting, clearing of the screen, or positioning of the cursor.
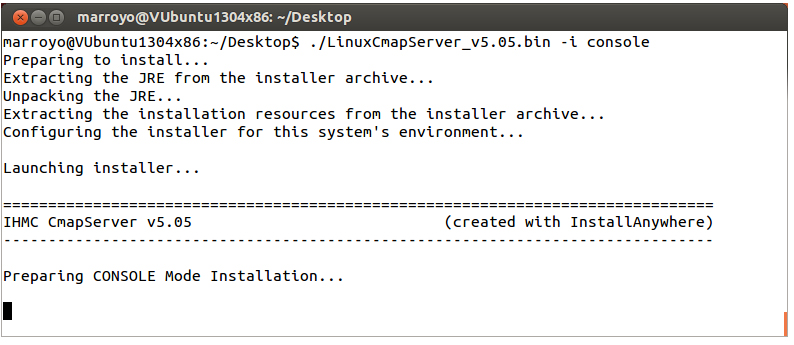
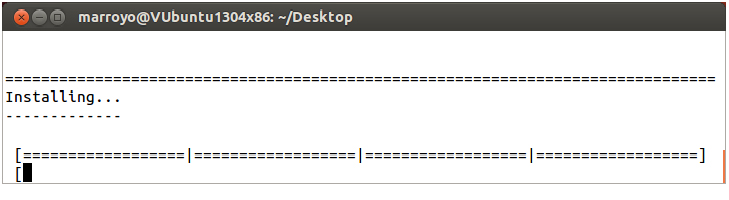
To run the Linux installer in Console Mode from the command line, type the following command (using the versions names and dates of the downloaded file):
./LinuxCmapServer_vx.xx_mm-dd-yy.bin –i console
The installer unpacks and installs a Java Runtime used only for installing and running the CmapServer, and displays the following message:
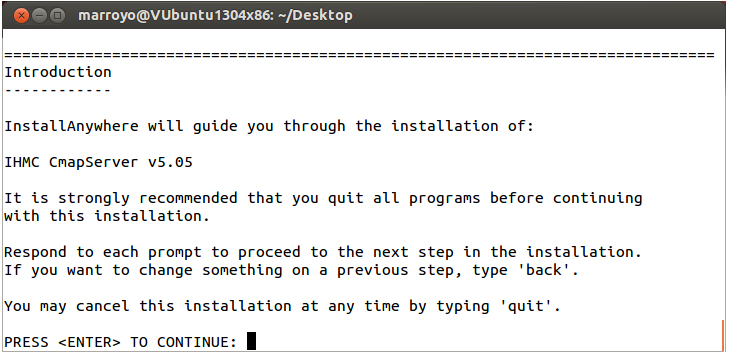
Information on how to move forward and back on the installation and how to quit are presented:
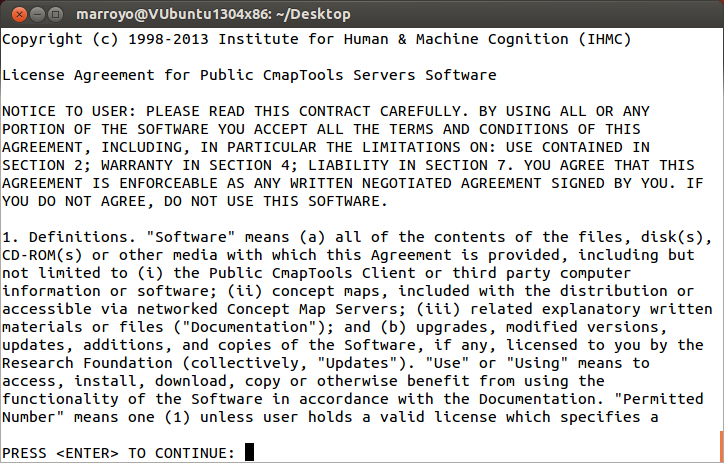
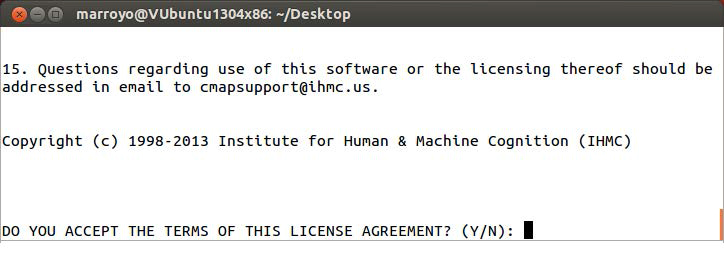
First, read, and accept the terms of the license agreement to continue
with the installation:
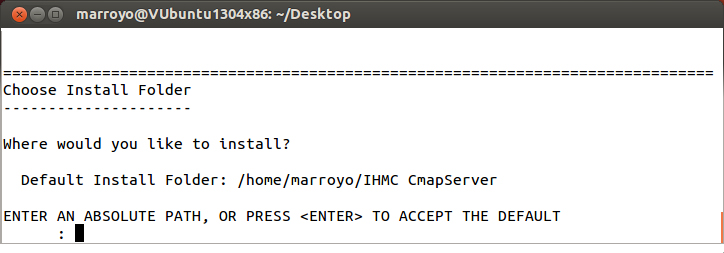
You must select the folder where you wish to install the CmapServer, the default folders are:
In Linux: /home/
In Mac OS X: /Applications/IHMC CmapServer
To select any other folder on which to install the CmapServer, specify its pathname.
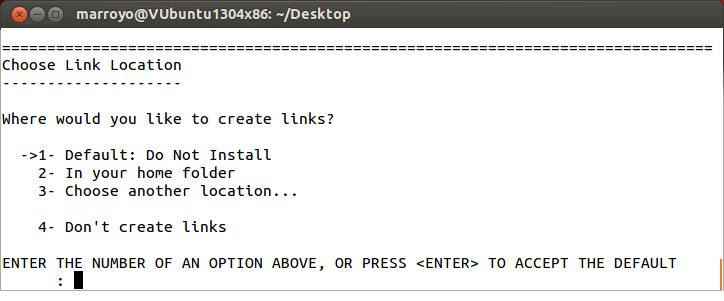
You can specify a location to create a link (in Linux) or an alias
(in Mac) to launch the CmapServer after the installation process.
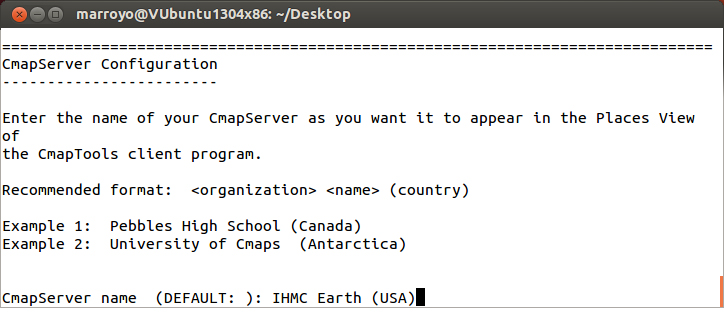
The CmapServer’s name is used to identify your server (Place) in the “Places
View” of the CmapTools clients. For a better identification of your CmapServer, we recommend you use the name of your organization followed by the name of your country in parentheses.
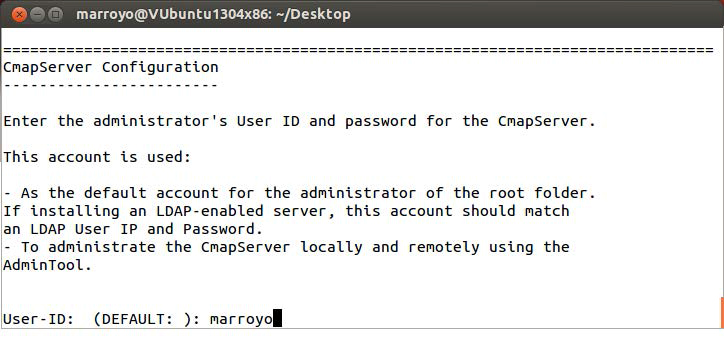
Next you need to provide the User ID and Password for the CmapServer's administrator. The adminstrator's User ID and Password for the CmapServer are used to:
To define the user-id and password of the CmapServer’s root folder. If you are installing an LDAP-enabled CmapServer, this account should match with a LDAP user-id and password in your network.
To read additional information about the root folder, see: “Permissions and Access Control in CmapTools”.
To define the user-id and password to access the CmapServer though the AdminTool application. The AdminTool is installed as part of CmapServer, enabling local and remote management of the CmapServer.

Once the server is launched, all the passwords in the configuration file (serverconfig.txt) will be encrypted.
For more information about replacing a password in the configuration file, see: “How to Replace an Encrypted Password”.
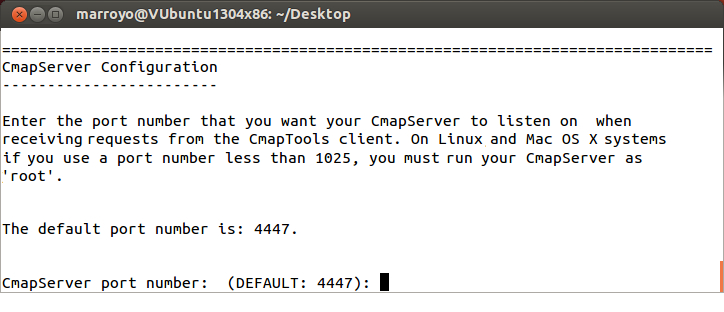
Next enter the port number of the CmapServer. The CmapTools clients will contact the server on this port. The default port number is 4447. IHMC public servers have been changed to use port 443.
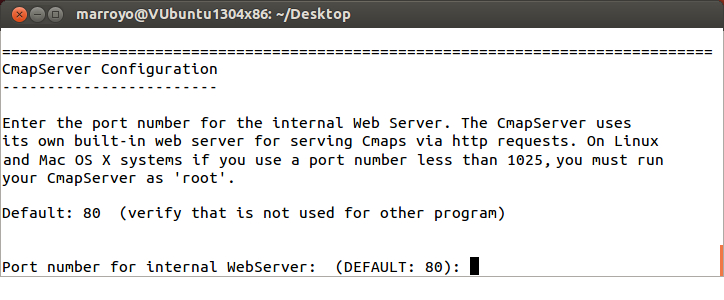
Next the port number of the internal web server has to be entered.
Under non-Windows systems, it may be necessary to change the value of this port to a number above 1024 if the server cannot run with administrative privileges (usually the 'root' account).
To read additional information regarding the internal web server on CmapServer, see: “CmapTools, Web Pages & Websites”.
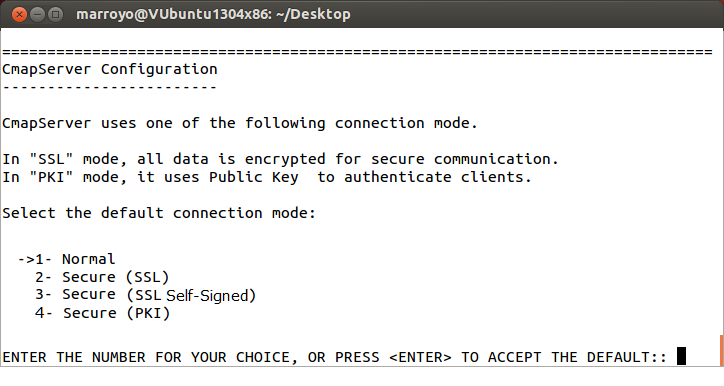
The communication mode provides the option of establishing a secure communication between the CmapServer and the CmapTools clients. The options for secure communications available are SSL and PKI. The "Normal" connection mode does not provide a secure communication.
If you select "Normal" connection mode, the installation program continues to the next step in the installation. No secure communication will be used.
The SSL (Secure Sockets Layer) protocol creates a secure connection between CmapTools clients and the CmapServer. It uses X.509 certificates and hence asymmetric cryptography to assure the counterparty whom they are talking with, and to exchange a symmetric key.
If you select “Secure (SSL)” connection mode, the installation program continues with the SSL Settings.
If you select "Secure (SSL Self-Signed)" connection mode, the installation program continues to the next step in the installation.
The PKI (Public Key Infrastructure) protocol creates a secure connection between CmapTools and the CmapServer. It uses a public and a private cryptographic key pair that is obtained and shared through a trusted authority.
If you select “Secure (PKI)” connection mode, the installation program continues with the PKI Settings.
Enter the path to the keystore that contains a valid X.509 SSL server certificate. If not specified, the server will generate a self-signed certificate to be stored in its default keystore with a random password.
Next specify the password to unlock the private key.
You have two options to specify the server’s certificate:
If you select to uses a file, enter the path name to the PKCS12 file
containing the server's certificate:
... and its private key:
If you select to uses a URL:
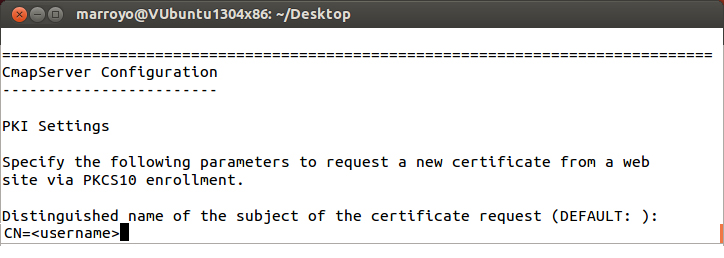
The parameters to request a new certificate from a website via PKCS10 enrollment are:
If set, the server will try to request a new certificate from the CA, otherwise, it will use the keystore file specified by pki.keystore.
There are two options to specify the CA’s certificate:
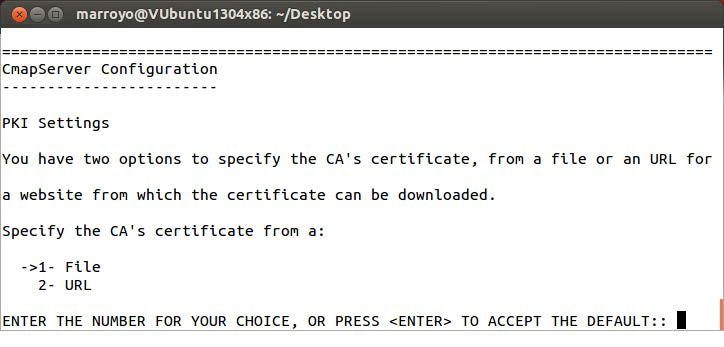
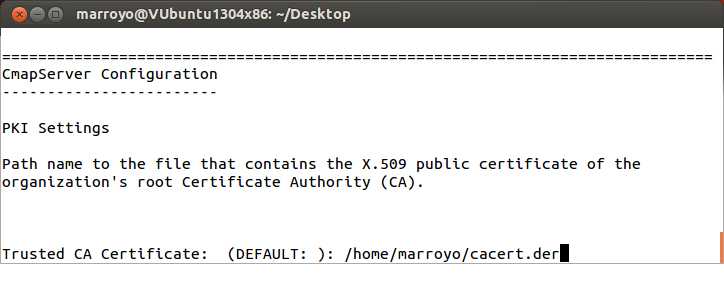
If you select File, enter the the pathname to the X.509 file containing the CA trusted certificate:
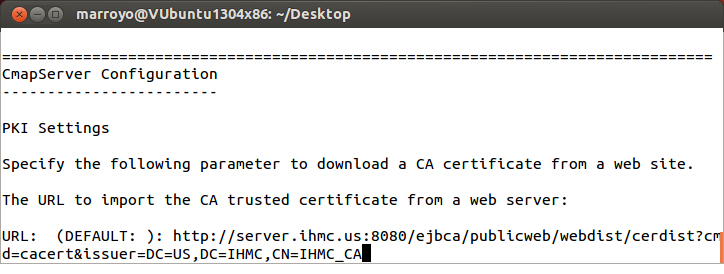
If you select to uses a URL:

Enter the URL to import the CA trusted certificate from a web server. If set, the
server will try to download the CA trusted certificate from the given URL,
otherwise, it will use the certificate file specified by pki.ca.certificate.
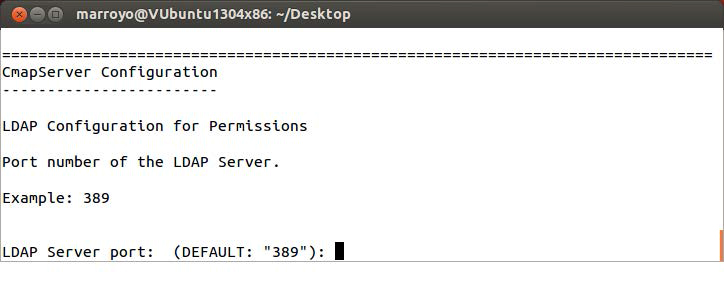
Next, enter the hostname of the LDAP server to retrieve Certificate Revocation
Lists (CRLs). This value is optional. If no LDAP host is specified, no
certificate revocation checking will be performed.

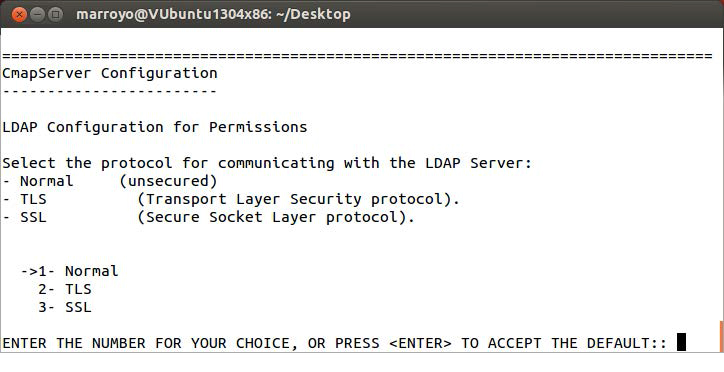
Next you need to select which security protocol is used to contact the LDAP server. Two security protocols are supported: TLS and SSL.
The CmapServer supports three authentication modes:
Your selection defines the entry “user.authentication” in the CmapServer configuration file to be one of the following:
If this entry is missing or blank, then standard permissions are assumed.
For more information on how to configure LDAP with CmapServer and use LDAP permissions in CmapTools, please see “Managing Users and Permissions Through LDAP”.
If you select standard authentication, the installation program continues with
the “Email Configuration”.
In the next step, the address and port number of the LDAP server are entered.
If a secure mode is selected, the PKI authentication settings will be used if they have been specified. Otherwise, the CmapServer will establish a secure LDAP connection without PKI authentication.
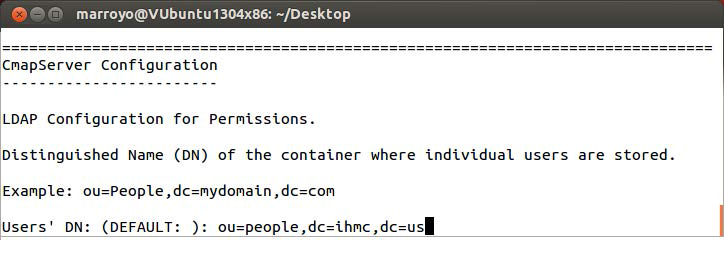
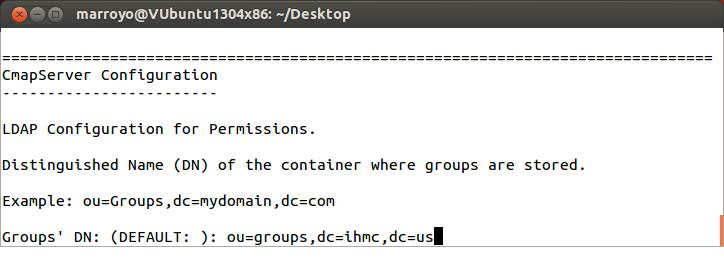
The following step requests the Distinguished Name (DN) of the LDAP
containers where individuals and groups are stored.
These containers will be searched with ‘subtree’ scope to determine the list of users and groups shown to the CmapTools client. Both static and dynamic (or role-based) groups are supported.
The next step asks for the name of the LDAP attribute which holds the user’s
ID. The value of this attribute will correspond to the notion of “User ID” in
the CmapTools client. For example, “uid” is a commonly used attribute for
this purpose.
The next step asks for the name of the LDAP attribute which holds the
group’s ID. The value of this attribute will again correspond to the “User ID”
in the CmapTools client. In most cases, the attribute “cn” is appropriate for
this case.
The CmapServer is capable of sending three types of email messages:
Status messages, usually sent to the CmapServer's administrator(s).
Examples of notification messages sent by the CmapServer are:
The CmapServer has successfully launhed and is now servicing clients.
The CmapServer attempted to launched but failed.
The CmapServer has detected a severe error and must shut down.
The CmapServer has shutdown (normal shutdown)
Discussion threads messages.
CmapTools users participating in a discussion thread can request to be notified if a new discussion thread message has been posted to that thread.
Request for a forgotten account and password.
If the CmapServer is using Normal permissions, and the user has forgotten a password for a folder, the user can request that the password be sent to the email address stored with the corresponding user ID.
The Cmapserver must be configured with the entries necessary to communicate with a your SMTP server. This begins with entering the DNS or IP address of the SMTP server to which the CmapServer should connect.
Next, enter the SMTP port number on which the CmapServer should connect to the
SMTP server.

Enter the transport protocol specified by the SMTP server. The allowed
values are Normal and SSL.

Enter the user id and password to be used to authenticate with the SMTP server.
Enter the email address to be used in the “From:” header of all emails sent by the CmapServer.
Enter the list of email addresses that should receive CmapServer status
notifications. White space and commas are interpreted as separators.
These email addresses will appear in the “To:” header of each status
message sent by the CmapServer.
The configuration of the CmapServer is complete. You are presented with a summary of the configuration entries. Verify this information and continue with the installation process.
When the installation begins, you will see this progress screen:
The installation has completed.
The installer creates a log file of the installation process, please check the
summary section of this file to verify the status of your installation.
For more information about this file, please see “The Installation Log File”.
Silent mode, which enables the CmapServer installer to run without any user interaction, is fully supported on all Unix platforms. A near-silent mode is possible on Windows and Mac OS X.
In silent mode, the installer has no end-user interaction, and runs either on the defaults provided by the installer, or by providing a properties file from which the installer retrieves the values for various variables used to control the install.
To trigger a silent installer from the command line, type the following command:
installername -i silent
A properties file may be specified from the command line:
installername -f <properties file>
You may use a direct or relative path to the properties file.
If no file is specified, then the installer automatically checks the directory in which it resides in for a file called "installer.properties" or [installername].properties. If properties files with both of these names exist in the same directory as the client executable, the "installer.properties" file will take precedence.
The properties file utilizes a simple key=value format. For example, a properties file might contain the following:
INSTALLER_UI=silent
USER_INSTALL_DIR=[selected directory]
The INSTALLER_UI variable allows you to specify the installer mode in the properties file, negating the need to use the -i silent command line switch.
Some additional observations regarding silent mode installs:
The following is the content of the properties file. Each of the relevant entries is described under the other installation modes in this manual and by the comments on the entry itself.
			The “CmapServer.properties” File
#	-------------------------------------------------------------------
#	WARNING
#
#	The Silent Mode installation is recommended only if you are
#	installing a new CmapServer. If you want to re-install a
#	CmapServer, it is recommended to use the Graphic or Text Mode
#	installation.
#
#	If you install a CmapServer in the same directory of a previous
#	installation, the installer will preserve the data, but not the
#	server-id. If you run a CmapServer with another server-id, all
#	links to Cmaps and resources in this server will be broken.
#
#	-------------------------------------------------------------------
#	How to Install CmapServer in Silent Mode.
#
#	Silent mode, enables a CmapServer installer to run without any
#	user interaction, and is supported on all platforms.
#
#	1.- Fill in all properties values corresponding with your
#	CmapServer's configuration.
#
#	2.- To run the installer in silent mode from the command line,
#	type the following command:
#
#		<Installer name> -f CmapServer.properties
#
#		You may use direct or relative paths to the properties file.
#
#	-------------------------------------------------------------------
#	Silent Mode Installation
#
INSTALLER_UI=silent

BUILD_VERSION=public
BUILD_TYPE=public

#	-------------------------------------------------------------------
#	The full path to the directory in which the CmapServer will be
#	installed.
#
#	You can use "/" as the file separator for all platforms, but if you
#	use "\", you must escape all special characters with an additional
#	"\". See the samples:
#
#	Example: C\:\\Program Files\\IHMC CmapServer (Windows)
#	Example: C:/Program Files/IHMC CmapServer (Windows)
#	Example: /Applications/IHMC CmapServer (Mac OS X)
#	Example: /usr/local/IHMC CmapServer (Linux)
#
USER_INSTALL_DIR=

#	-------------------------------------------------------------------
#	Enter the name of your CmapServer as you want it to appear in the
#	Places View of the CmapTools client program.
#
#	Recommended format <organization> <name> (country)
#
#	Example 1: Pebbles High School (Canada)
#	Example 2: University of Cmaps (Antarctica)
#
server.name=

#	The organization to which this server belongs to.
#
#	Example: My Organization
#
server.org=

#	-------------------------------------------------------------------
#
#	The default location for the Server root folder is:
#
server.rootfolder=../serverRootFolder

save.as.xml=false

#	-------------------------------------------------------------------
#	Networking Configuration
#
#	The bind address is the Internet address that the server and the
#	webserver will be listening on for incoming requests. When not
#	specified, the server and the webserver will listen on any/all
#	local addresses (including 127.0.0.1).
#
#	Unless the server and the webserver need to be configured to run
#	in a multi-homed environment, it is recommended to leave this
#	parameter empty.
#
#	Example: server.bind.address = 123.123.123.1
#
server.bind.address=

#	The hostname is the Internet address that will be used to generate
#	the  URLs of the  web pages of the Cmaps stored on the CmapServer,
#	and it is determined  automatically by the server.
#
#	Edit this property if you want the server to use a specific
#	hostname to generate the URLs.
#
#	It is recommended that you enter a full computer name rather
#	than an IP address.
#
#	Example: server.hostname = mypc.mydomain
#
server.hostname=

#	The IP address is the Internet address that CmapTools will use to
#	contact the CmapServer and it is automatically determined and
#	registered by the server.
#
#	Edit this property if you want the server to register a specific
#	IP address.
#	Use only dotted-decimal TCP/IP addresses.
#
#	Example: server.ip.address = 123.123.123.1
#
server.ip.address=

#	-------------------------------------------------------------------
#	Enter the administrator's User ID and password for the#	CmapServer. This account is used:
#
#	- To administrate the CmapServer locally and remotely using the
#	  AdminTool.
#
admin.account=
admin.password=

#	IMPORTANT:
#
#	Once the server is launched, the password will be encrypted in the
#	CmapServer's configuration file (serverconfig.txt). To replace the
#	encrypted password:
#	  - Shutdown the CmapServer.
#	  - Edit the CmapServer's configuration file (serverconfig.txt).
#	  - Replace the text: encrypted_<some random characters>\=
#	    with the value of the new password.
#	  - Launch the CmapServer again.
#	All passwords that were replaced in this file will again be
#	encrypted once the CmapServer has been launched.
#	-------------------------------------------------------------------
#	These options specify the username and password of the server's
#	root folder administrator.
#
root.folder.account=
root.folder.password=

#	IMPORTANT:
#
#	Once the server is launched, the password will be encrypted in the
#	CmapServer's configuration file (serverconfig.txt). To replace the
#	encrypted password:
#	  - Shutdown the CmapServer.
#	  - Edit the CmapServer's configuration file (serverconfig.txt).
#	  - Replace the text: encrypted_<some random characters>\=
#	    with the value of the new password.
#	  - Launch the CmapServer again.
#	All passwords that were replaced in this file will again be
#	encrypted once the CmapServer has been launched.
#	-------------------------------------------------------------------
#	Enter the port number that you want your CmapServer to listen on
#	when receiving requests from the CmapTools client. On Linux, Solaris
#	and Mac OS X systems if you use a port number less than 1025, you
#	must run your CmapServer as 'root'.
##	The default port number is: 4447
#
server.port=4447

#	-------------------------------------------------------------------
#
#	Enter the port number for the internal Web Server. The CmapServer
#	uses its own built-in web server for serving Cmaps via http requests.
#	On Linux, Solaris, and Mac OS X systems if you use a port number
#	less than 1025, you must run your CmapServer as 'root'.
#
#	The default port is: 80 (verify that is not used for other program)
#
webserver.port=80

#	Host address of the name server used by some services (DTs) to
#	resolve domain names for sending email notifications.
#
nameserver=ns.ihmc.us

#	-------------------------------------------------------------------
#
#	CmapServer uses one of the following connection mode.
#
#	In "SSL" mode, all data is encrypted for secure communication.
#	In "PKI" mode, it uses Public Key to authenticate clients.
#
#	Select the default connection mode #
#	The valid values are: normal, ssl or pki (lowercase only)
#
server.connection.mode=normal

#	-------------------------------------------------------------------
#
#	SSL Setting
#
#	The path name to the PKCS12 file containing the server's certificate
#	and its private key.
#
#	You can use "/" as the file separator for all platforms, but if you
#	use "\", you must escape all special characters with an additional
#	"\". See the samples:
#
#	Example: C\:\\Documents and Settings\\user\\cert.p12  (Windows)
#	Example: C:/Documents and Settings/user/cert.p12      (Windows)
#	Example: /home/user/cert.p12                          (Linux)
#	Example: /Users/user/cert.p12                         (Mac OS X)
#
ssl.keystore=

#	Password to unlock the private key.
#
ssl.keystore.password=

#	-------------------------------------------------------------------
#
#	PKI Setting
#
#	Parameters to request a new certificate from a website via PKCS10
#	enrollment.
#
#	pki.csr.url, URL to which the PKCS10 certificate request should
#	be sent.
#
pki.csr.url=

#	pki.csr.url.params, optional params to post before sending the
#	certificate request.
#
pki.csr.url.params=

#	pki.csr.subject, distinguished name of the subject of the
#	certificate request.
#
pki.csr.subject=

#	If set, the server will try to request a new certificate from the
#	CA, otherwise, it will use the keystore file specified by
#	pki.keystore (see below).
#	The path name to the PKCS12 file containing the server's
#	certificate and its private key.
#
pki.keystore=

#	The password for accessing the server's keystore.
#
#	IMPORTANT:
#
#	Once the server is launched, the password will be encrypted in the
#	CmapServer's configuration file (serverconfig.txt). To replace the
#	encrypted password:
#	  - Shutdown the CmapServer.
#	  - Edit the CmapServer's configuration file (serverconfig.txt).
#	  - Replace the text: encrypted_<some random characters>\=
#	    with the value of the new password.
#	  - Launch the CmapServer again.
#	All passwords that were replaced in this file will again be
#	encrypted once the CmapServer has been launched.
#
pki.keystore.password=

#	The URL to import the CA trusted certificate from a web server.
#
#	If set, the server will try to download the CA trusted certificate
#	from the given URL, otherwise, it will use the certificate file
#	specified by pki.ca.certificate (see below).
#
pki.ca.cert.url=

#	The path name to the X.509 file containing the CA trusted certificate.
#
#	You can use "/" as the file separator for all platforms, but if you
#	use "\", you must escape all special characters with an additional
#	"\". See the samples:
#
#	Example: C\:\\Documents and Settings\\user\\cacert.der (Windows)
#	Example: C:/Documents and Settings/user/cacert.der (Windows)
#	Example: /home/user/cacert.der (Linux)
#	Example: /Users/user/cacert.der (Mac OS X)
#
pki.ca.certificate=

#	The hostname of the LDAP server to retrieve Certificate #	Revocation Lists (CRLs).
#
#	This value is optional. If no LDAP host is specified, no certificate
#	revocation checking will be performed.
#
pki.ldap.host=

#	The port number of the LDAP server.
#
#	Defaults is: 389
#
pki.ldap.port=389

#	Specifies which security protocol is used to contact the LDAP server.
#	Two security protocols are supported: TLS and SSL
#
#	Default is: tls
#
pki.ldap.mode=tls

#	-------------------------------------------------------------------
#	Logging Configuration
#
#	Enable logging.
#
#	Default is 'yes'
#
logger.enabled=yes

#	This option specifies the path to the directory where log files are
#	created.
#
#	%h = user home directory
#	%t = user temporary directory
#
#	Default is: '%h/logs'
#
logger.file.path=../logs

#	This option specifies the prefix of the log file name. The log file
#	name is generated using this prefix and a counter. For example:
#	logfile0.log, logfile1.log, etc. being logfile0.log the most
#	recently modified.
#
#	Default is 'logfile'
#
logger.file.prefix=cmapserver

#	This option specifies the maximum size in bytes of each log file.
#	When the maximum size is reached, a new log file is created.
#
#	Default is '5242880' (5 MB)
#
logger.file.size=5242880

#	This option specifies the maximum number of log files that can be
#	created. When the maximum number is reached, the files are rotated
#	by removing the oldest log file.
#
#	Default is '10'
#
logger.file.number=10

#	-------------------------------------------------------------------
#	Collaboration Configuration
#
#	The collaboration.audio variable indicates whether audio chat is
#	permitted during Synchronous Collaboration sessions on this server.
#	Set to enabled is permitted; otherwise set to disabled.
#
collaboration.audio=disable

#	-------------------------------------------------------------------
#	LDAP Configuration for Permissions
#
#	These settings enable the CmapServer to use an LDAP directory for user
#	authentication when defining permissions for folders.
#	Authentication mode: standard permissions, LDAP permissions, or both
#	If this line is missing or blank, then standard permissions is assumed
#	Valid values: authentication.standard
#	                        authentication.ldap
#	                        authentication.standard,authentication.ldap
##	Example (for both): user.authentication = authentication.standard,authentication.ldap
#
user.authentication=authentication.standard

#	User ID of the root folder administrator for an LDAP-enabled server.
#	This User ID should match an entry in the LDAP server.
#
ldap.root.folder.account=

#	Password of the root folder administrator for an LDAP-enabled server.
#	This password should match the password stored in the LDAP server.
#
ldap.root.folder.password=

#	IMPORTANT:
#
#	Once the server is launched, the password will be encrypted in the
#	CmapServer's configuration file (serverconfig.txt). To replace the
#	encrypted password:
#	  - Shutdown the CmapServer.
#	  - Edit the CmapServer's configuration file (serverconfig.txt).
#	  - Replace the text: encrypted_<some random characters>\=
#	    with the value of the new password.
#	  - Launch the CmapServer again.
#	All passwords that were replaced in this file will again be
#	encrypted once the CmapServer has been launched.
#	IP address or hostname of the LDAP server
#
#	Example: ldap.user.directory.ip = myhost.mydomain.com
#
ldap.user.directory.ip=

#	Port number of the LDAP server
#
ldap.user.directory.port=389

#	Protocol to use for communication with the LDAP server.
#	If a secure mode is selected, the certificates from the PKI
#	settings above will be used, if they have been specified.
#	Valid values: normal, tls, or ssl
#
#	Example: ldap.user.directory.connection.mode=normal
#
ldap.user.directory.connection.mode=normal

#	DN of the container where individual users are stored
##	Example: ldap.user.directory.usersBaseDN = ou=People,dc=mydomain,dc=com
#
ldap.user.directory.usersBaseDN=

#	DN of the container where groups are stored
#
#	Example: ldap.user.directory.groupsBaseDN = ou=Groups,dc=mydomain,dc=com
#
ldap.user.directory.groupsBaseDN=

#	Name of the attribute which holds the user's ID
#
ldap.user.directory.userAttr=uid

#	Name of the attribute which holds the group's ID
#
ldap.user.directory.groupAttr=cn

#	-------------------------------------------------------------------
#	Server and Embedded Web Server Configuration
#
#	The webserver.program.name variable tells the CMapServerShell which
#	webserver to try to instantiate.
#
#	The webserver.home.directory variable tells the cmapserver the
#	home directory of the webserver that it is instantiating.
#
#	Examples:
#	webserver.program.name=lite.webserver
#	webserver.home.directory=../lws
#	webserver.program.name=jigsaw.webserver
#	webserver.home.directory=../jigsaw/jigsaw
#	Enables/disables the logger of the web server.
#
#	Default is: false
#
webserver.logging.enabled=false

#	Sets the root folder (the webapps directory) of the webserver.
#	This is the directory that contains the index.html file.
#
#	This option applies only when the webserver program is tomcat.webserver.
#
#	If not set, it defaults to TOMCAT_HOME/webapps/ROOT.
#
webserver.root.folder=

#	-------------------------------------------------------------------
#	Directory of Places Configuration
#
#	The CmapServer will contact the Directory of Places (DoP) to register.
#	The default list of Directory of Places is:
#
net.slp.DAAddresses=dop2.ihmc.us:4748:80,dop.ihmc.us:80:8001

#	The default list of Scopes is:
#
net.slp.useScopes=cmap,cmapdp,public

#	This option specifies the listening port for all SLP messages (TCP and UDP).
#	The option applies to: UAs, SAs
#
net.slp.port=4747

#	-------------------------------------------------------------------
#	Advanced Server Configuration
#
#	WARNING: Unless strictly necessary, we recommend not to change this values
#	as it may affect the server's performance and availability.
#
#	Maximum number of client connections the server can handle simultaneously.
#	If the number of client connections being handled simultaneously reaches this
#	maximum, further accepted connections will be put in a queue (see
#	server.socket.backlog).
#
#	Default is: 30
#
concurrent.client.limit=30

#	Maximum number of client connections that can be accepted while the server
#	is busy. If the number of client connections waiting in the queue reaches
#	this maximum, further connection attempts will be refused.
#
#	Default is: 47
#
server.socket.backlog=47

#	Time in milliseconds the server will wait for the client request to arrive.
#	If the request times out, the connection is dropped.
#
#	Default is: 30000 (30 seconds)
#
request.read.timeout=30000

#	Time in milliseconds the server will keep a persistent connection open.
#	If the persistent connection times out, the connection is closed.#
#	Default is: 10000 (10 seconds)
#
persistent.connection.lifetime=10000

#	This option specifies the maximum number of resource descriptors that are
#	stored on disk (known as ResourceInfo objects) that the server will cache
#	in memory to increase response time.
#
#	A very large value will require a considerable amount of memory, but it
#	will improve the response time of the server. On the other hand, a shorter
#	value will require less memory, but the server will take more time to
#	response as it constantly needs to read data from disk.
#
#	Default is '2000'
#
project.cache.size=2000

#	This option specifies whether or not the server should cache the table of
#	contents (TOC) of the root folder and send the cache'd value back to the
#	client, or whether it should simply serialize the root folder TOC every time
#	is requested, which can be a very expensive operation.
#
#	It is recommended that for large root folders, this value should be set
#	to 'true'.  If this flag is absent, the value defaults to 'false'.
#
cache.root.folder.toc=true

#	Boolean that determines whether or not the server should generate thumbnails for:
#	1. Each resource whose major mimetype is image (e.g. .jpg, .png, .gif, .bmp)
#	2. Each .cmap file that is a zipfile containing a htmljpeg part.
#	The thumbnails themselves are also jpeg's. Each thumbnail gets stored in the
#	ResourceInfo of the resource to which it pertains.
#
generate.thumbnails=true

#	Boolean that determines whether or not the server should erase all thumbnails
#	at startup (while reindexing all the resources)
#	This can be used in conjunction with generate.thumbnails.  E.g., if you want
#	to regenerate all thumbnails, you can set erase.thumbnails to true and set
#	generate.thumbnails to true.
#	If you want to just remove all thumbnails from your system, you should set
#	erase.thumbnails to true and generate.thumbnails to false
#
erase.thumbnails=false

#	All servers create an index of their contents to permit searching. This index
#	can be sent to an IndexServer that responds to client search requests.#
#	This has two benefits:
#
#	 1) This server is not burdened (CPU and network) with responding to  search
#	    requests  from other clients,
#
#	 2) The overall search time for clients is more consistent, as  there  is just
#	    one  network connection.
#
#	 The index retains its permission settings, so searching the IndexServer
#	 will be  just  like  searching on the server directly, in that the only
#	 resources returned for a search  request will be those the searcher has
#	 permission to see.
#
#	 Most of the time, you will want to leave this variable set to true
#
sendtoindexserver=true

#	This variable controls how often the server sends  its  index to  the
#	IndexServer,  and  is expressed in minutes.
#
#	If you have a fast internet connection, the default value of sending the
#	index every ten (10) minutes should be adequate.  If you have a slower
#	internet connection, one that is  somewhat unreliable, or a very large
#	number of resources on your server (e.g., 20-30,000  resources), then
#	you may want to increase the timeout value to 60 or 120 (1 or 2 hours).
#
sendtoindexserver.timeout=10

#	This variable controls how the index is sent to the indexserver.
#
#	The default method for sending the index to the indexserver is to package
#	the entire index into one file and transmits it to the indexserver. For
#	servers with a large number of resources or that are very actively updated,
#	the amount of data being transmitted can be reduced by sending just the
#	Information about what has changed to the indexserver and integrating that
#	Information on the indexserver.  If there are any errors in the transmission,
#	the entire index will be sent, and incremental updating will resume afterwards.
#
sendtoindexserver.incremental=true

#	This variable controls if protected resources should be kept in the index
#
#	The indexserver currently has no way to authenticate permissions on cmap-
#	servers configured with LDAP permissions.  These servers can still send
#	their indices to the indexserver, but may remove all of the resources that
#	are not publicly viewable from the index beforehand.  This is solely an efficiency
#	concern on the indexserver. #
#	If the user authentication is LDAP, specify true in this parameter.
#
sendtoindexserver.removeHidden=false

#	Whether to create the index that allows you to search for cmaps
#	and resources.  The default is true.
#
index.create=true

#	Controls whether the topology values are generated for concept maps.
#	The topology generation code is currently under development and
#	may sometimes cause the indexer to stall.  The default is true.
#
index.generate.topology.value=true

#	The CmapServer is capable of sending three types of email messages:
#
#	1. Status messages sent by the CmapServer's administrator(s).
#	   Examples of notification messages sent by the CmapServer are:
#	       a. The CmapServer has successfully restarted and is now servicing clients.
#	       b. The CmapServer attempted to restart but failed.
#	       c. The CmapServer has detected a severe error and must shut down.
#
#	2. Discussion thread messages.  Each user of CmapTools can request to be notified
#	   if a new discussion thread message has been posted to a particular discussion
#	   thread on this CmapServer.
#
#	3. Request for a forgotten account and password. Sometimes a user of CmapTools
#	   might attempt to perform an operation (e.g. save a Cmap) in a folder for which
#	   the CmapServer claims that the user has no permission to perform that
#	   operation. The user will be prompted for a userid and password.  If the user
#	   still believes that he does have permissions on that folder, he may request
#	   his permissions list, along with the corresponding userid and password
#	   necessary to perform the desired action. If the credentials in the user's
#	   profile match the credentials stored in one or more permissions lists in the
#	   folder, the CmapServer will attempt to send an email to the email address
#	   stored with the permissions list.
#
#	Explanation of what "mail" fields are mandatory, which are optional, and which
#	are only useful in certain cases.
#
#	      mail.smtp.host always mandatory
#	      mail.smtp.port always mandatory
#	      mail.smtp.transport always mandatory
#	      mail.cmapserver.email.address always mandatory
#	      mail.smtp.transport always mandatory; must be either NORMAL or SSL
#	      mail.smtp.authentication.userid only if SMTP server requires authentication
#	      mail.smtp.authentication.password only if SMTP server requires authentication
#	      mail.cmapserver.status.recipients only for status emails
#
#	      mail.smtp.fallback.port
#
#	      only useful if you know that the SMTP server provides both SSL and NORMAL
#	      transport, and you have set mail.smtp.transport to SSL and you have set
#	      mail.smtp.port to the SMTP server's SSL port.  If the SSL fails, the CmapServer
#	      will automatically attempt NORMAL transport over the port value supplied here.
#
#	The DNS or IP address of the SMTP server to which the CmapServer should connect.
#	Always mandatory.
#
#	Example: mail.smtp.host = smtp.domain.com
#
mail.smtp.host=

#	The SMTP port number on which the CmapServer should connect to the SMTP server.
#	Always mandatory.
#
#	Example: mail.smtp.port = 25
#
mail.smtp.port=465

#	This field is not provided in the CmapServer Installation program. It will only
#	be used by the CmapServer if mail.smtp.transport is set to SSL and the CmapServer
#	fails to connect via SSL to the SMTP server on the specified port.
#	Not mandatory. Leaving it blank is the same as setting it to 25.
#
#	Example: mail.smtp.fallback.port = 25
#
mail.smtp.fallback.port=

#	The transport protocol specified by the SMTP server.  May not be blank.
#	Only one valued may be specified. If more than one value is specified, the first
#	value found will be used. Allowed values are NORMAL and SSL
#	Always mandatory.
#
#	Example: mail.smtp.transport = normal
#
mail.smtp.transport=ssl

#	The userid and password for authenticating with the SMTP server.
#	Mandatory if and only if the SMTP server requires authentication.
#	NOTE: If the SMTP server does not require authentication, leave these blank!
#
#	Example: mail.smtp.authentication.userid = no-reply
#	         mail.smtp.authentication.password = p@ssw0rd#
#
mail.smtp.authentication.userid=
mail.smtp.authentication.password=

#	The email address in the "From: " header of all emails sent by the CmapServer
#	Mandatory for the sending of all emails. For some SMTP servers, the userid in
#	this email address must match the userid in mail.smtp.authentication.userid
#
#	Example: mail.cmapserver.email.address = no-reply@domain.com
#
mail.cmapserver.email.address=

#	The list of e-mail addresses that should receive CmapServer status notifications.
#	White space and commas are interpreted as separators.
#	These email addresses will appear in the To: header of each status message sent by the CmapServer.
#	Mandatory only for the CmapServer to send out status messages.
#
#	Example: mail.cmapserver.status.recipients = admin1@domain.com, admin2@gmail.com,
#	admin3@hotmail.com
#
mail.cmapserver.status.recipients=

#	-------------------------------------------------------------------
#	End of file: CmapServer.properties
#	-------------------------------------------------------------------
You can have the CmapServer launch automatically each time you start the computer.
If the CmapServer is running under Windows, a service is created automatically and described in the installation process above in this manual.
To configure CmapServer as a service under Linux or Mac OS X follow the instructions below.
nohub <Installation directory>/bin/CmapServer &
Note: modify the path to your current installation directory.Go to /Library/LaunchDaemons/
Sample “us.ihmc.cmapserver.plist” file:
<?xml version="1.0" encoding="UTF-8"?><!DOCTYPE plist PUBLIC "-//Apple//DTD PLIST 1.0//EN" "http://www.apple.com/DTDs/PropertyList-1.0.dtd"><plist version="1.0"><dict> <key>Label</key> <string>us.ihmc.cmapserver</string> <key>UserName</key> <string>root</string> <key>GroupName</key> <string>wheel</string> <key>WorkingDirectory</key> <string>/Applications/IHMC CmapServer/bin</string> <key>ProgramArguments</key> <array> <string>CmapServer.app/Contents/MacOS/CmapServer</string> </array> <key>RunAtLoad</key> <true/></dict></plist>If you want to manually launch or stop the IHMC CmapServer, then you need to open a terminal window and run the corresponding command, after creating the file described below:
To launch the CmapServer:
sudo launchctl load /Library/LaunchDaemons/us.ihmc.cmapserver.plist
To stop the CmapServer:
sudo launchctl unload /Library/LaunchDaemons/us.ihmc.cmapserver.plist
The installation program provides most of the configuration parameters for theCmapServer. However, there are other parameters that can be set manually. For these particular parameters the default value is used unless they are manually modified.
The file “serverconfig.txt” is stored in a folder titled “bin” under the CmapServer installation directory.
After any modifications to the configuration file, you need to restart the CmapServer before the new parameters take effect.
All servers are identified by a unique server.id entry in the serverconfig.txt file. This id is automatically generated the first time the CmapServer runs.
Two servers cannot have the same server.id entry.
All references to resources (Cmaps, images, videos, etc.) consist of a server.id + resource.id. The server.id indicates in which CmapServer the resource is located (the CmapTools client also has a unique server.id). The resource.id is also unique across the CmapTools network and identifies the resource within the CmapServer (path information is not used to identify resources, including Cmaps).
This way, a link to a resource consists of a server.id and resource.id tuple. When moving a CmapServer to another location, you need to copy the server.id entry to the new location. The IP address can change, but the server.id should be maintained. This also means that both your new and old servers cannot be running at the same time. If both CmapServers have the same server.id, they will be constantly "replacing" each other in the CmapTools Views since every time one registers with the Directory of Places (DOP) it will replace the other one.
Once the CmapServer is launched, all the passwords in the configuration file will be encrypted. To replace an encrypted password, you need to shutdown the CmapServer and type in the new password. When the CmapServer is relaunched, the password will be replaced in the configuration file with the encrypted text.
All passwords that were replaced in this file will again be encrypted once the CmapServer has been launched.
Each of the entries in the serverconfig.txt file has comments as an explanation. The following is an example serverconfig.txt file.
###############################################
# serverconfig.txt
#
# IHMC CmapServer Configuration file
#
###############################################
#
# Networking Configuration
#
# The bind address is the Internet address that the server and the
# webserver will be listening on for incoming requests. When not specified,
# the server and the webserver will listen on any/all local addresses
# (including 127.0.0.1).
#
# Unless the server and the webserver need to be configured to run in a
# multi-homed environment, it is recommended to leave this parameter
# empty.
#
# Example: server.bind.address = 123.123.123.1
server.bind.address=
# The hostname is the Internet address that will be used to generate the
# URLs of the web pages of the Cmaps stored on the CmapServer, and it is
# determined automatically by the server.
#
# Edit this property if you want the server to use a specific hostname to
# generate the URLs.
#
# It is recommended that you enter a full computer name rather than an
# IP address.
## Example: server.hostname = mypc.mydomain
server.hostname=
# The IP address is the Internet address that CmapTools will use to contact
# the CmapServer and it is automatically determined and registered by the
# server.
#
# Edit this property if you want the server to register a specific IP address.
# Use only dotted-decimal TCP/IP addresses.
#
# Example: server.ip.address = 123.123.123.1
server.ip.address=
# All servers create an index of their contents to permit searching. This
# index can be sent to an IndexServer that responds to client search
# requests.
#
# This has two benefits:
#
# 1) This server is not burdened (CPU and network) with responding to
# search requests from other clients.
#
# 2) The overall search time for clients is more consistent, as there is just
# one network connection.
#
# The index retains its permission settings, so searching the IndexServer
# will be just like searching on the server directly, in that the only
# resources returned for a search request will be those the searcher has
# permission to see.
#
# Most of the time, you will want to leave this variable set to true
sendtoindexserver=true
# This variable controls how often the server sends its index to the
# IndexServer, and is expressed in minutes.
#
# If you have a fast internet connection, the default value of sending the
# index every ten (10) minutes should be adequate. If you have a slower
# internet connection, one that is somewhat unreliable, or a very large
# number of resources on your server (e.g., 20-30,000 resources), then
# you may want to increase the timeout value to 60 or 120 (1 or 2 hours).
sendtoindexserver.timeout=10
# This variable controls how the index is sent to the indexserver.
#
# The default method for sending the index to the indexserver is to package
# the entire index into one file and transmit it to the indexserver. For
# servers with a large number of resources or that are very actively updated,
# the amount of data being transmitted can be reduced by sending just the # information about what has changed to the indexserver and integrating
# that information on the indexserver. If there are any errors in the
# transmission, the entire index will be sent, and incremental updating will
# resume afterwards.
sendtoindexserver.incremental=true
# This variable controls if protected resources should be kept in the index
#
# The indexserver currently has no way to authenticate permissions on
# cmapservers configured with LDAP permissions. These servers can still
# send their indicies to the indexserver, but may remove all of the resources
# that are not publicly viewable from the index beforehand. This is soley an
# efficiency concern on the indexserver.
sendtoindexserver.removeHidden=false
# Whether to create the index that allows you to search for cmaps
# and resources. The default is true.
index.create=true
# Controls whether the topology values are generated for concept maps.
# The topology generation code is currently under development and
# may sometimes cause the indexer to stall. The default is true.
index.generate.topology.value=true
# The server can be contacted using either normal, ssl or pki
# connection mode.
#
# In ssl mode, all data is encrypted for secure communication.
# In pki mode, the server activates the SSL connection mode, but it uses
# PKI infrastructure to authenticate clients.
#
# Administrators can configure the server to operate using normal, ssl
# or pki mode.
#
# IMPORTANT: It is highly recommended not to change the connection
# mode after the server has become operational (except when changing
# from ssl to pki or vice versa). All links pointing to resources in this server
# will be broken because the webserver changes its protocol from http to
# https or vice versa, while the URL of the link remains the same.
server.connection.mode=normal
###############################################
#
# SSL OPTIONS
#
# The path to the keystore that contains a valid X.509 SSL server certificate.
#
# If not specified, the server will generate a self-signed certificate to be # stored in its default keystore with a random password.
ssl.keystore=
# The password for accessing the keystore specified in ssl.keystore, if any.
#
# IMPORTANT: Once the server is launched, the password will be encrypted.
# To replace the encrypted password: shutdown the server, remove the
# encrypted_<some random characters>\\= (no quotes) value completely,
# type in the new password for the value, then save this file and launch the
# CmapServer again. All passwords that were replaced in this file will again
# be encrypted once the CmapServer has been launched.
ssl.keystore.password=
###############################################
#
# PKI Configuration
#
# Parameters to request a new certificate from a website via PKCS10
# enrollment.
#
# pki.csr.url
# - URL to which the PKCS10 certificate request should be sent.
#
# pki.csr.url.params
# - optional params to post before sending the certificate request.
#
# pki.csr.subject
# - distinguished name of the subject of the certificate request.
#
# If set, the server will try to request a new certificate from the CA,
# otherwise, it will use the keystore file specified by pki.keystore (see
# below).
pki.csr.url=
pki.csr.url.params=
pki.csr.subject=
# The path to the PKCS12 file containing the server's certificate and
# its private key.
pki.keystore=
# The password for accessing the server's keystore.
#
# IMPORTANT: Once the server is launched, the password will be encrypted.
# To replace the encrypted password: shutdown the server, remove the
# encrypted_<some random characters>\\= (no quotes) value completely,
# type in the new password for the value, then save this file and launch the
# CmapServer again. All passwords that were replaced in this file will again # be encrypted once the CmapServer has been launched.
pki.keystore.password=
# The URL to import the CA trusted certificate from a web server.
#
# If set, the server will try to download the CA trusted certificate
# from the given URL, otherwise, it will use the certificate file
# specified by pki.ca.certificate (see below).
pki.ca.cert.url=
# The path to the X.509 file containing the CA trusted certificate.
pki.ca.certificate=
# The hostname of the LDAP server to retrieve Certificate
# Revocation Lists (CRLs).
#
# This value is optional. If no LDAP host is specified, no certificate
# revocation checking will be performed.
#
pki.ldap.host=
# The port number of the LDAP server.
# Defaults is: 389
pki.ldap.port=389
# Specifies which security protocol is used to contact the LDAP server.
# Two security protocols are supported: TLS and SSL
#
# Default is: tls
pki.ldap.mode=tls
###############################################
#
# Server and Embedded Web Server Configuration
#
# The webserver.program.name variable tells the CMapServerShell which
# webserver to try to instantiate.
#
# The webserver.home.directory variable tells the cmapserver the
# home directory of the webserver that it is instantiating.
#
# Examples:
# webserver.program.name=lite.webserver
# webserver.home.directory=../lws
# webserver.program.name=jigsaw.webserver
# webserver.home.directory=../jigsaw/jigsaw
# Enables/disables the logger of the web server.#
# Default is: false
webserver.logging.enabled=false
# Sets the root folder (the webapps directory) of the webserver.
# This is the directory that contains the index.html file.
#
# This option applies only when the webserver program is tomcat.webserver.
#
# If not set, it defaults to TOMCAT_HOME/webapps/ROOT.
webserver.root.folder=
# Specifies the folder in the machine's file system used by the server
# to store the cmaps and resources.
server.rootfolder=../serverRootFolder
save.as.xml=false
# The name of the server.
# This is the name that will be diplayed in the Views of CmapTools.
#
# Example: My CmapServer
server.name=IHMC Earth (USA)
# The organization to which this server belongs to.
#
# Example: My Organization
server.org=
# The port number of the server.
# CmapTools clients will contact the server on this port.
#
# Default is '4447'
server.port=4447
# The port number of the embedded web server.
#
# Under non-Windows systems, it may be necessary to change the value
# of this port to a number above 1024 if the server cannot run
# with administrative privileges (usually the 'root' account).
#
# Default is '80'
webserver.port=80
# Host address of the name server used by some services (DTs) to
# resolve domain names for sending email notifications.nameserver=ns.ihmc.us
# The Home Folders Directory specifies the directory where the CmapServer
# will create the Home Folder for a CmapTools user when that user selects
# the option.
# Create Home Folder. The default value is blank. Setting a value for this
# field will enable the CmapTools option Create Home Folder. Leaving this
# field blank will disable the option. Even if this field is blank, the Properties
# dialog box of any existing user folder may always be used to set that
# folder as the user's Home Folder. From the user's point of view, if they
# have a Home Folder on this CmapServer, then it will always be visible in
# the Places view in CmapTools.
# Example: home.folders.directory = Users
# Example: home.folders.directory = Users/HomeFolders
home.folders.directory=Users
###############################################
#
# AdminTool and Root Folder Administration Account Configuration
#
# IMPORTANT: Once the server is launched, the values for any password
# parameter in this file, including values for the admin.password= and
# root.folder.password=, will be encrypted.
# To replace any encrypted password: shutdown the server, remove the
# encrypted_<some random characters>\\= (no quotes) value completely,
# type in the new password for the value, then save this file and launch the
# CmapServer again. All passwords that were replaced in this file will again
# be encrypted once the CmapServer has been launched.
#
# These options specify the username and password to access the server
# through the AdminTool program. The contact email address (optional) is
# used by the server to send notifications about startup problems or
# shutdown events.
admin.account=marroyo
admin.password=12gf12ggf22
admin.email.address=marroyo@ihmc.us
# These options specify the username and password of the server's root
# folder administrator.
root.folder.account=marroyo
root.folder.password=12gf12ggf22
###############################################
#
# Logging Configuration
## Enable logging.
#
# Default is 'yes'
logger.enabled=yes
# This option specifies the path to the directory where log files are created.
#
# %h = user home directory
# %t = user temporary directory
#
# Default is: '%h/logs'
logger.file.path=../logs
# This option specifies the prefix of the log file name. The log file name is
# generated using this prefix and a counter. For example: logfile0.log,
# logfile1.log, etc. being logfile0.log the most recently modified.
#
# Default is 'logfile'
logger.file.prefix=cmapserver
# This option specifies the maximum size in bytes of each log file.
# When the maximum size is reached, a new log file is created.
#
# Default is '1048576' (1 MB)
#
logger.file.size=5242880
# This option specifies the maximum number of log files that can be created.
# When the maximum number is reached, the files are rotated by removing
# the oldest log file.
#
# Default is '10'
logger.file.number=10

################################################
# Collaboration Configuration
#
# The collaboration.audio variable indicates whether audio chat is permitted
# during Synchronous Collaboration sessions on this server. Set to enabled
# is permitted; otherwise set to disabled.
collaboration.audio=disable
# Maximum number of clients that can collaborate simultaneously relative to
# the number of clients that can be served concurrently in this CmapServer
# (see concurrent.client.limit). If '0' (0%), the number of collaboration
# clients is unlimited and bound by the maximum number of clients that this
# CmapServer can serve concurrently.
## It is recommended to always set a limit in the number of collaboration
# clients, otherwise, the CmapServer will be unable to handle further
# requests once all threads are taken by collaboration clients.
#
# Default is '80' (80% of concurrent.client.limit).
collaboration.max.clients=80

###############################################
#
# LDAP Configuration for Permissions
#
# These settings enable the CmapServer to use an LDAP directory for user
# authentication when defining permissions for folders.
# Authentication mode: standard permissions, LDAP permissions, or both
# If this line is missing or blank, then standard permissions is assumed
# Valid values: authentication.standard
# authentication.ldap
#
# Example (for both): user.authentication =
# authentication.standard,authentication.ldap
user.authentication=authentication.standard
# User ID of the root folder administrator for an LDAP-enabled server.
# This User ID should match an entry in the LDAP server.
ldap.root.folder.account=marroyo
# Password of the root folder administrator for an LDAP-enabled server.
# This password should match the password stored in the LDAP server.
#
# IMPORTANT: Once the server is launched, the password will be encrypted.
# To replace the encrypted password: shutdown the server, remove the
# encrypted_<some random characters>\\= (no quotes) completely,
# type in the new password for the value, then save this file and launch the
# CmapServer again. All passwords that were replaced in this file will again
# be encrypted once the CmapServer has been launched.
ldap.root.folder.password=marroyo
# IP address or hostname of the LDAP server
#
# Example: ldap.user.directory.ip = myhost.mydomain.com
ldap.user.directory.ip=
# Port number of the LDAP server
ldap.user.directory.port=389
# Protocol to use for communication with the LDAP server.
# If a secure mode is selected, the certificates from the PKI
# settings above will be used, if they have been specified.
# Valid values: normal, tls, or ssl
#
# Example: ldap.user.directory.connection.mode=normalldap.user.directory.connection.mode=normal
# DN of the container where individual users are stored
#
# Example: ldap.user.directory.usersBaseDN=
# ou=People,dc=mydomain,dc=com
ldap.user.directory.usersBaseDN=
# DN of the container where groups are stored
#
# Example:
# ldap.user.directory.groupsBaseDN=ou=Groups,dc=mydomain,dc=com
ldap.user.directory.groupsBaseDN=
# Name of the attribute which holds the user's ID
ldap.user.directory.userAttr=uid
# Name of the attribute which holds the group's ID
ldap.user.directory.groupAttr=cn
# This option specifies whether or not the server should cache the table of
# contents (TOC) of the root folder and send the cache'd value back to the
# client, or whether it should simply serialize the root folder TOC every time
# is requested, which can be a very expensive operation.
#
# It is recommended that for large root folders, this value should be set
# to 'true'. If this flag is absent, the value defaults to 'false'.
cache.root.folder.toc=true
# Boolean that determines whether or not the server should generate
# thumbnails for:
# 1. Each resource whose major mimetype is image
# (e.g. .jpg, .png, .gif, .bmp)
# 2. Each .cmap file that is a zipfile containing a htmljpeg part.
# The thumbnails themselves are also jpeg's. Each thumbnail gets stored in
# the ResourceInfo of the resource to which it pertains.
#
generate.thumbnails=true
# Boolean that determines whether or not the server should erase all
# thumbnails at startup (while reindexing all the resources)
# This can be used in conjunction with generate.thumbnails. E.g., if you
# want to regenerate all thumbnails, you can set erase.thumbnails to true
# and set generate.thumbnails to true.
# If you want to just remove all thumbnails from your system, you should
# set erase.thumbnails to true and generate.thumbnails to false.erase.thumbnails=false
################################################
# Advanced Server Configuration
#
# WARNING: Unless strictly necessary, we recommend not to change this
# values as it may affect the server's performance and availability.
#
# Maximum number of client connections the server can handle
# simultaneously.
# If the number of client connections being handled simultaneously reaches
# this maximum, further accepted connections will be put in a queue (see
# server.socket.backlog).
#
# Default is: 100
concurrent.client.limit=100
# Maximum number of client connections that can be accepted while the
# server is busy. If the number of client connections waiting in the queue
# reaches this maximum, further connection attempts will be refused.
#
# Default is: 47
server.socket.backlog=47
# Time in milliseconds the server will wait for the client request to arrive.
# If the request times out, the connection is dropped.
#
# Default is: 30000 (30 seconds)
request.read.timeout=30000
# Time in milliseconds the server will keep a persistent connection open.
# If the persistent connection times out, the connection is closed.
#
# Default is: 10000 (10 seconds)
persistent.connection.lifetime=10000
# This option specifies the maximum number of resource descriptors that
# are stored on disk (known as ResourceInfo objects) that the server will
# cache in memory to increase response time.
#
# A very large value will require a considerable amount of memory, but it
# will improve the response time of the server. On the other hand, a shorter
# value will require less memory, but the server will take more time to
# response as it constantly needs to read data from disk.
#
# Default is '2000'
project.cache.size=2000# The CmapServer is capable of sending three types of email messages:
# 1. Status messages sent by the CmapServer's administrator(s).
# Examples of notification messages sent by the CmapServer are:
# a. The CmapServer has successfully restarted and is now servicing
# clients.
# b. The CmapServer attempted to restart but failed.
# c. The CmapServer has detected a severe error and must shut down.
# 2. Discussion thread messages. Each user of CmapTools can request to
# be notified if a new discussion thread message has been posted to a
# particular discussion thread on this CmapServer.
# 3. Request for a forgotten account and password. Sometimes a user of
# CmapTools might attempt to perform an operation (e.g. save a Cmap)
# in a folder for which the CmapServer claims that the user has no
# permission to perform that operation. The user will be prompted for a
# userid and password. If the user still believes that he does have
# permissions on that folder, he may request his permissions list, along
# with the corresponding userid and password
# necessary to perform the desired action. If the credentials in the user's
# profile match the credentials stored in one or more permissions lists in
# the folder, the CmapServer will attempt to send an email to the email
# address stored with the permissions list.
#
# Explanation of what mail fields are mandatory, which are optional, and
# which are only useful in certain cases.
# mail.smtp.host always mandatory
# mail.smtp.port always mandatory
# mail.smtp.transport always mandatory
# mail.cmapserver.email.address always mandatory
# mail.smtp.transport always mandatory;
# must be either NORMAL or SSL
# mail.smtp.authentication.userid only if SMTP server requires
# authentication
# mail.smtp.authentication.password only if SMTP server requires
# authentication
# mail.cmapserver.status.recipients only for status emails
#
# mail.smtp.fallback.port only useful if you know that the SMTP server
# provides both SSL and NORMAL transport, and you have set
# mail.smtp.transport to SSL and you have set mail.smtp.port to the SMTP
# server's SSL port. If the SSL fails, the CmapServer will automatically
# attempt NORMAL transport over the port value supplied here.
#
# The DNS or IP address of the SMTP server to which the CmapServer
# should connect.
# Always mandatory.
# Example: mail.smtp.host = smtp.domain.com
mail.smtp.host=smtp.ihmc.us
# The SMTP port number on which the CmapServer should connect to the
# SMTP server.
# Always mandatory.
# Example: mail.smtp.port = 25mail.smtp.port=465
# This field is not provided in the CmapServer Installation program. It will
# only be used by the CmapServer if mail.smtp.transport is set to SSL and
# the CmapServer fails to connect via SSL to the SMTP server on the
# specified port.
# Not mandatory. Leaving it blank is the same as setting it to 25.
#
# Example: mail.smtp.fallback.port = 25
mail.smtp.fallback.port=
# The transport protocol specified by the SMTP server. May not be blank.
# Only one valued may be specified. If more than one value is specified, the
# first value found will be used. Allowed values are NORMAL and SSL
# Always mandatory.
#
# Example: mail.smtp.transport = normal
mail.smtp.transport=normal
# The userid and password for authenticating with the SMTP server.
# Mandatory if and only if the SMTP server requires authentication.
# NOTE: If the SMTP server does not require authentication, leave these
# blank!
#
# Example mail.smtp.authentication.userid = no-reply
# mail.smtp.authentication.password = p@ssw0rd
mail.smtp.authentication.userid=marroyo@ihmc.us
mail.smtp.authentication.password=p@ssword
# The email address in the From: header of all emails sent by the
# CmapServer.
# Mandatory for the sending of all emails. For some SMTP
# servers, the userid in this email address must match the userid in
# mail.smtp.authentication.userid
#
# Example: mail.cmapserver.email.address = no-reply@domain.com
mail.cmapserver.email.address=no-reply@ihmc.us
# The list of e-mail addresses that should receive CmapServer status
# notifications. White space and commas are interpreted as separators.
# These email addresses will appear in the To: header of each status
# message sent by the CmapServer.
# Mandatory only for the CmapServer to send out status messages.
#
# Example: mail.cmapserver.status.recipients = admin1@domain.com,
# admin2@gmail.com, admin3@hotmail.com
mail.cmapserver.status.recipients=user1@ihmc.us
CmapServer is written in Java. The Java Virtual Machine (JVM) is assigned a specific amount of memory when launched, and it is limited by that amount.
On the other hand, the JVM consumes memory until it uses all the memory allocated to it, so you need to be careful not to allocate too much memory, particularly if your computer does not have a lot of memory.
By default, IHMC CmapServer is assigned 512 MB for the minimum heap size and 1024 MB for the maximum heap size of memory. This has been found to be adequate for most users. (For reference, the large Public CmapServers at IHMC run with a maximum heap size of 3072 MB. The smaller CmapServers at IHMC run with a maximum of 1024 MB). Below are the instructions on how to increase the memory for the different platforms.
To increase the amount of memory allocated, you need to modify a file called "CmapServer.lax" which is found in a directory (folder) called "bin", under the directory (folder) where the CmapServer program was installed. By default, this file is located in the directory (folder):
C:\Program Files\IHMC CmapServer\bin (Windows)
/home/
Inside the file, using a text editor (e.g. NotePad, vi), find the line that indicates, in bytes, the amount of memory that will be used by the CmapServer. It should look something like (the number at the end may be different):
lax.nl.java.option.java.heap.size.max =1073741824
(where the number at the end indicates the number of bytes)
To increase the amount of memory, for example to 2048 MB , you need to change the line to:
lax.nl.java.option.java.heap.size.max =2122317824
(where 2,122,317,824 bytes = 2048 * 1024 * 1024 = 2048 MB)
For this change to take effect, save the file and start the CmapServer again.
Locate the folder where the CmapServer application is installed. Open the "bin" folder.
Right-click on the "CmapServer.app" file and select "Show Package Contents".
Open the "Contents" folder.
With a text editor, edit the "Info.plist" file.
Look for the entries:
<string>-Xms256M</string>

              <string>-Xmx512M</string>
These are the minimum and maximum sizes. Change and 256M and 512M for whatever value you need, particularly the maximum size.
For this change to take effect, save the file and start the CmapServer again.
After the installation of CmapServer, the installer creates a log file in the folder:
<Installation Directory>\UninstallerData\Logs
The log file name is:
<product_name>_Install_<mm>_<dd>_<yyyy>_<hh>_<mm>_<ss>.log
For example:
IHMC_CmapServer_v5.05_Install_10_04_2013_18_22_51.log
This log file corresponds to the installation of IHMC CmapServer v5.05 in Oct 04, 2013 at 6:22:51 pm.
Please check the summary section of this file to verify the status of your installation.
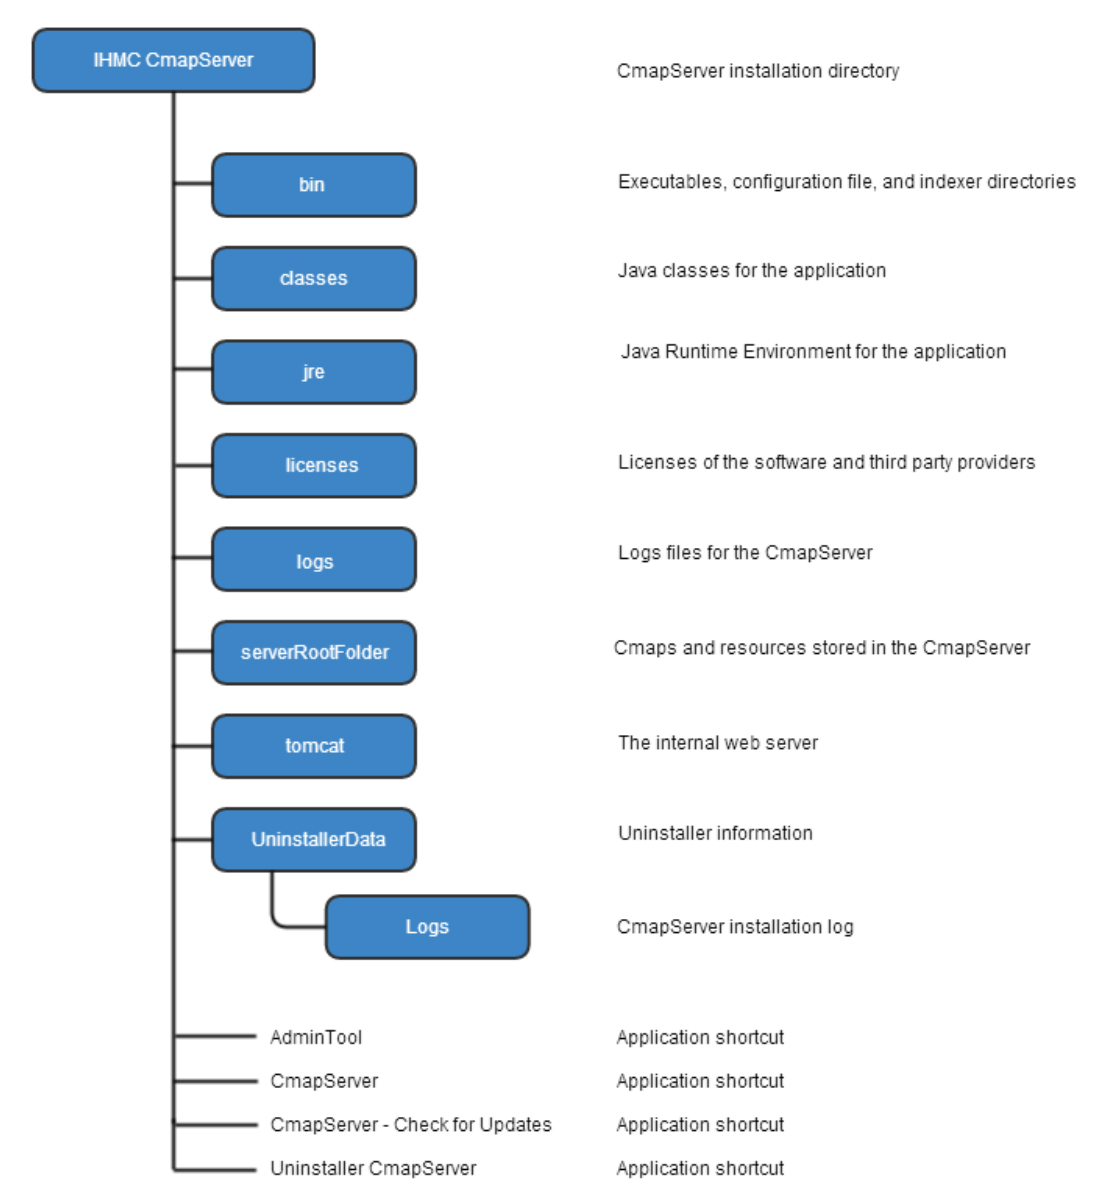
To update a CmapServer you just need to resintall the latest version over the current version. When you reinstall over a previous version of a CmapServer, the installer preserves all of your previously-stored data (Cmaps and resources in serverRootFolder) and the previous configuration of your CmapServer (server-id, server name, ports, and everything else).
Steps to updating the CmapServer:
.../IHMC CmapServer/serverRootFolder/
.../IHMC CmapServer/bin/serverconfig.txt
.../IHMC CmapServer/bin/slp.conf
The AdminTool is installed together with the CmapServer, but you can install this program as a standalone application too, enabling local and remote management of CmapServers and Directory of Places (DoP's).
A CmapServer is a “Place”, a location where you share your Cmaps and resources with others.
Detailed information about the CmapTools Network Architecture is available in the CmapServer-Documentation section located in "Documentation & Support".
The AdminTool program is stored in a folder titled “bin” under the CmapServer installation directory.
When running AdminTool you can see the application’s main window; it displays the list of servers that you have added to the tool:
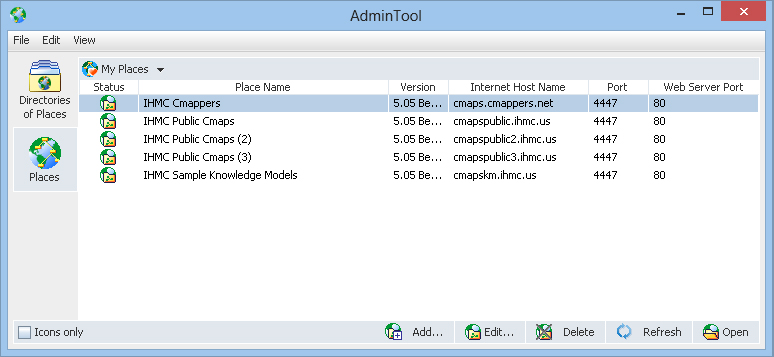
If you are running Admintool in the same machine that is running CmapServer, you will not be asked for the UserID and Password, but if you are running Admintool in another computer and try to open a CmapServer, for example the “IHMC Cmappers”, you need to provide the User ID and Password:
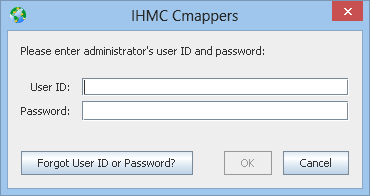
For a specific CmapServer, the AdminTool window displays four information areas:
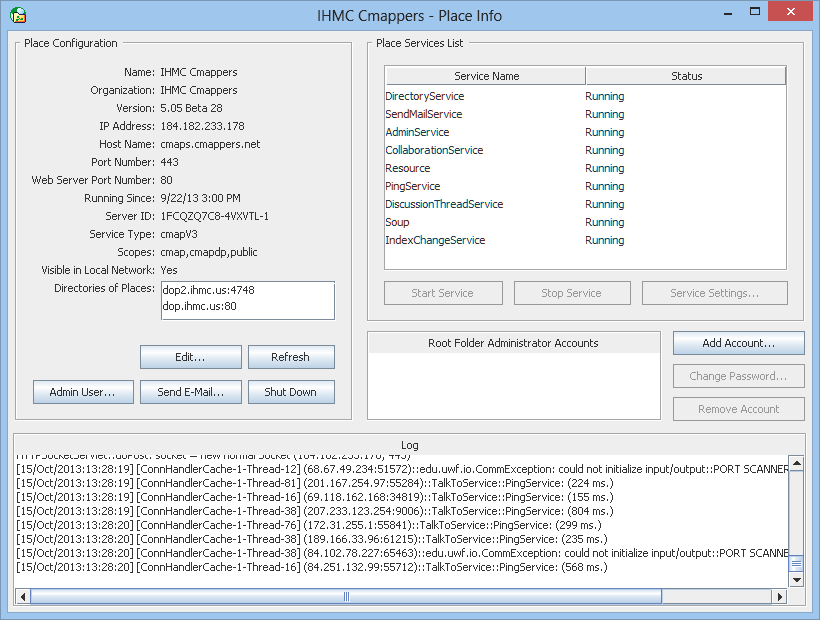
Clicking on the “Edit…” button allows you to change the CmapServer's Configuration.
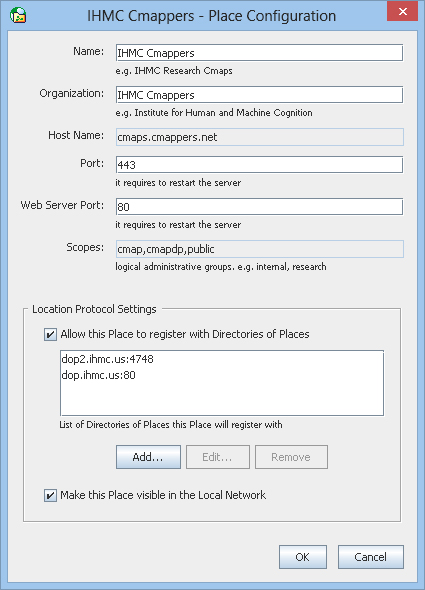
You need to restart the CmapServer for the new configuration changes to take effect.
Clicking on the “Admin User…” button allows you to change the Administration Account to access the Admintool, by providing the following data:
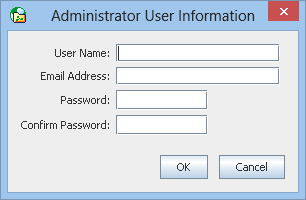
By default the Administrator Account provided during the CmapServer's installation is displayed.
Clicking on the “Send E-Mail...” button will send an email with the CmapServers’s log files.
For example:
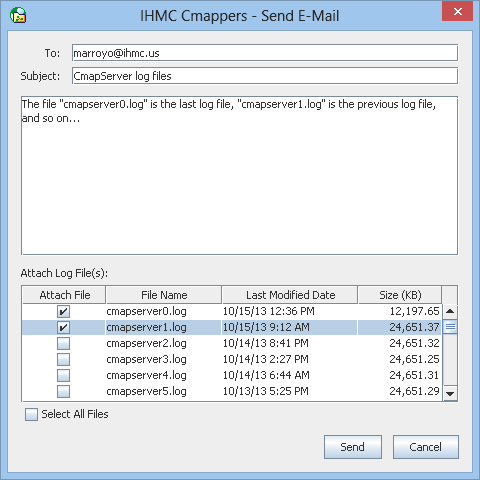
The log file name is generated using the prefix “cmapserver” and a counter, e.g., cmapserver0.log, cmapserver1.log, etc. being cmapserver0.log the most recently modified log.
For more information about the parameters of log files, see: “Logging Configuration” section in the CmapServer's configuration file.
Clicking on the “Shut Down” button shuts down the CmapServer after asking for the following confirmation:
You can add more Root Folder Administrator Accounts by clicking on the “Add Account...” button, and filling the following dialog box:
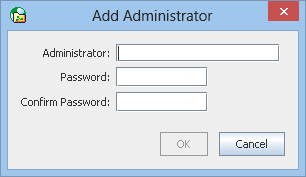
You can also change the Password or Remove an Account by pressing the corresponding button in the Root Folder Administrator Accounts area.For additional information about the root folder, see: “Permissions and Access Control in CmapTools”.
The Place Services List show the list of services running in your CmapServer. You can stop, start or change settings of a service. Select a service and press the corresponding button. This is seldom necessary and therefor not used much.
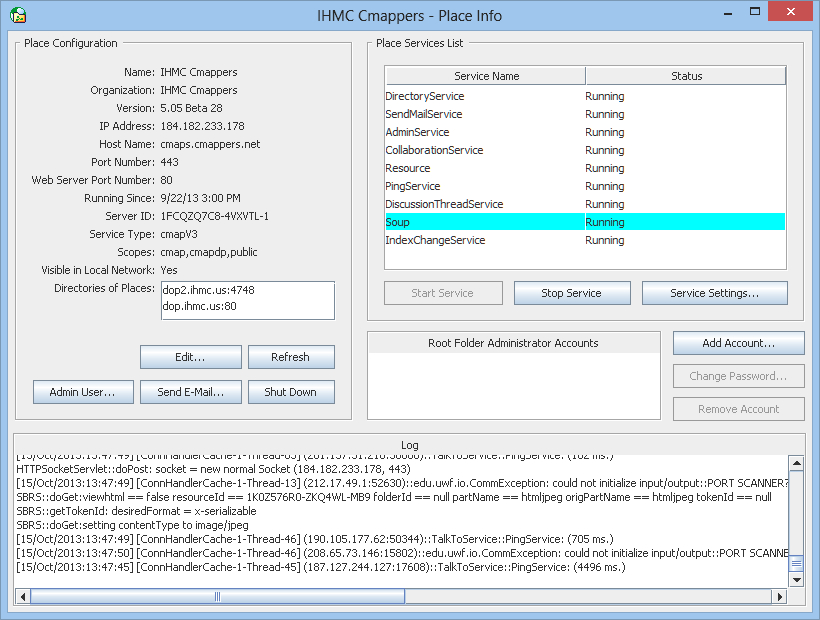
If you press the right click of your mouse over the log you a menu with these options is displayed:

You can search for a string in the log file to analyze a particular error:
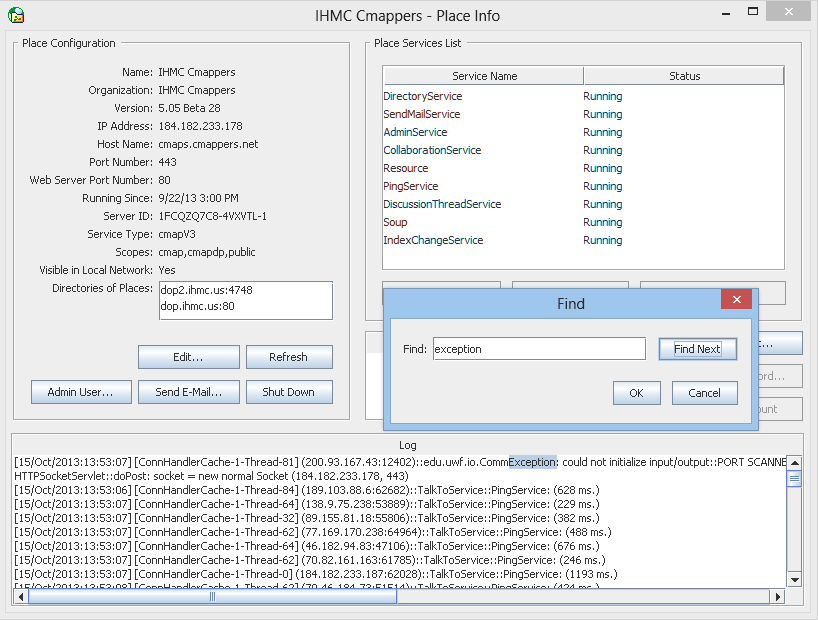
You have two options to display the CmapServers in the AdminTool.
In the following example some public CmapServers pre-selected from the All Places list are displayed.
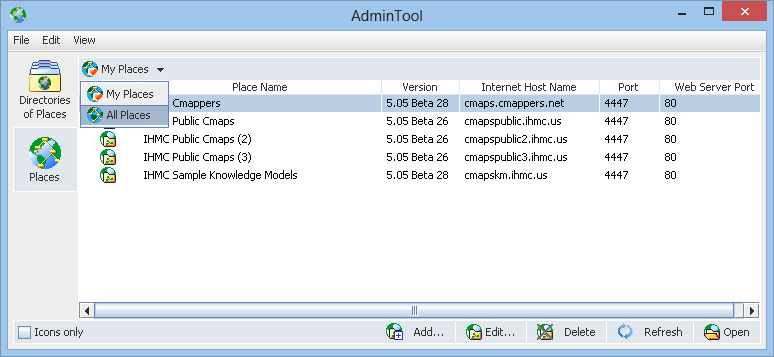
If you select “All Places” you can see the complete list of CmapServers:
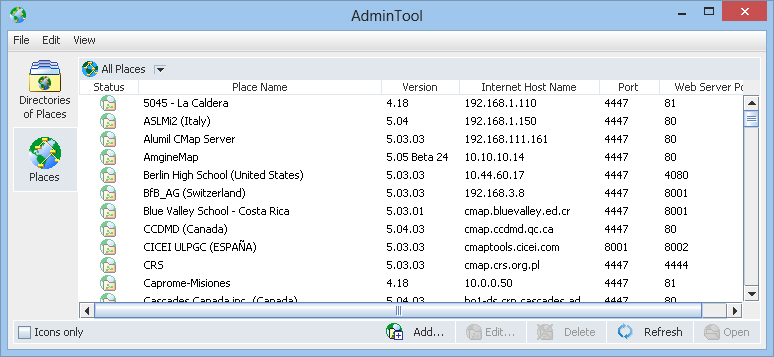
If you want to add a specific Place (CmapServer)to the “My Places” list, select a CmapServer from the complete list, press the right click of the mouse and select “Add Place(s) to “My Places” option.
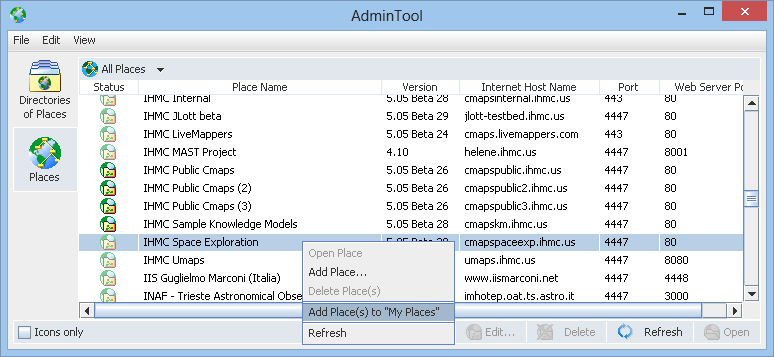
You can manually add a CmapServer to “My Places” by providing the IP address or domain name, port number, and web server port after you press the “Add…” button in the Places view.
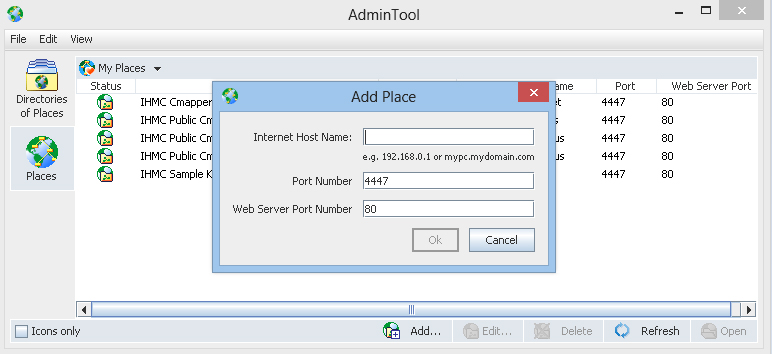
The AdminTool can also administrate Directories of Places (DoP's). To display the Directories of Places View, select the “Directories of Places” on the left tabs, or selecting the menu option: view - Directories of Places.
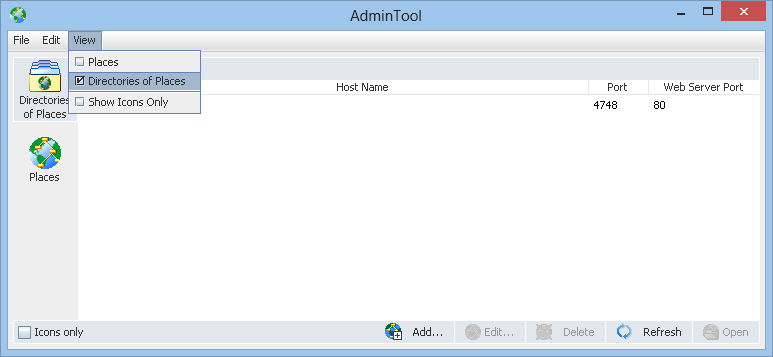
When you try to open a DoP, for example the “dop.ihmc.us”, you will be asked to
provide the User ID and Password:
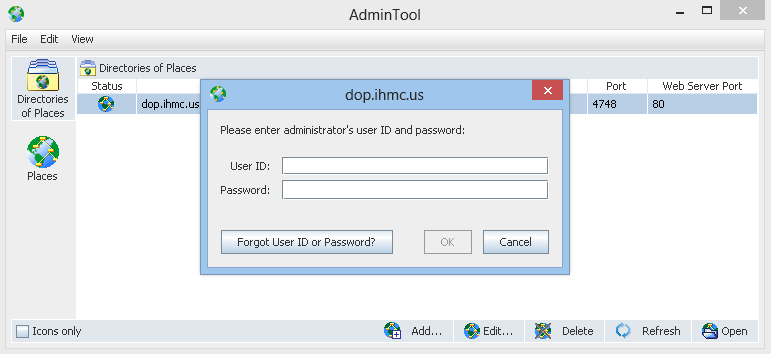
The displayed window shows four information areas:
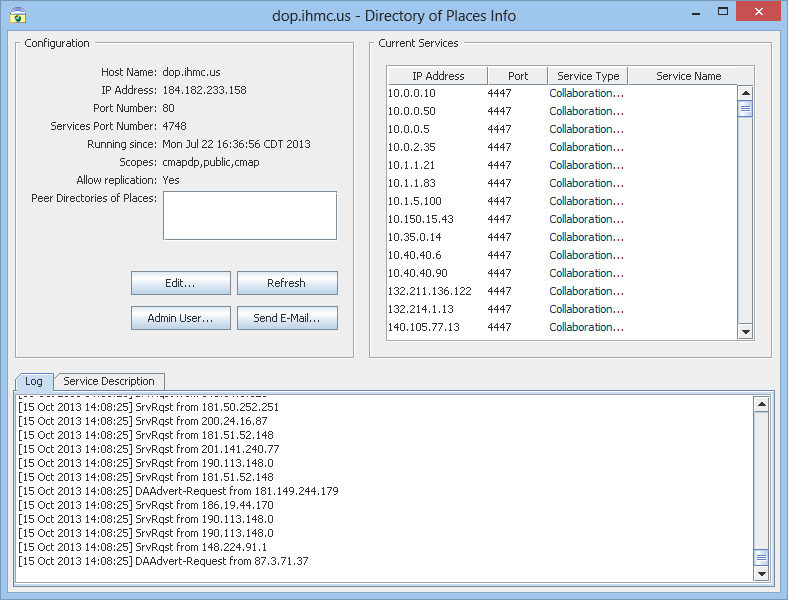
If you select a service from the list, its description is displayed, for example:
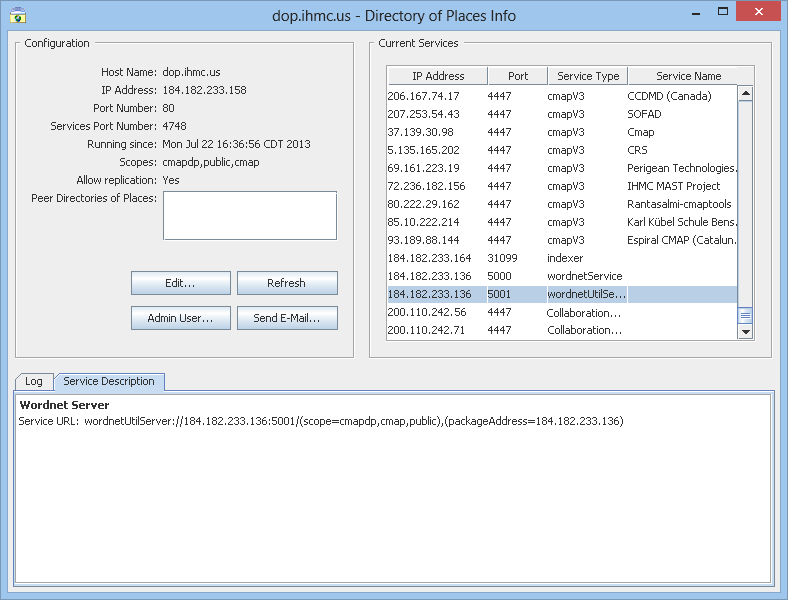
If you select a service corresponding to a CmapServer (service type:
cmapV3), the following information is displayed:
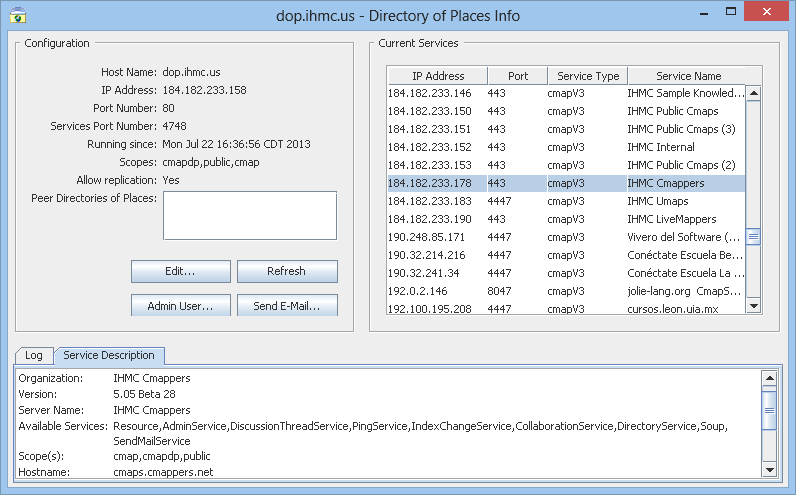
Clicking on the “Edit…” button enables changing the Directory of Places Configuration.
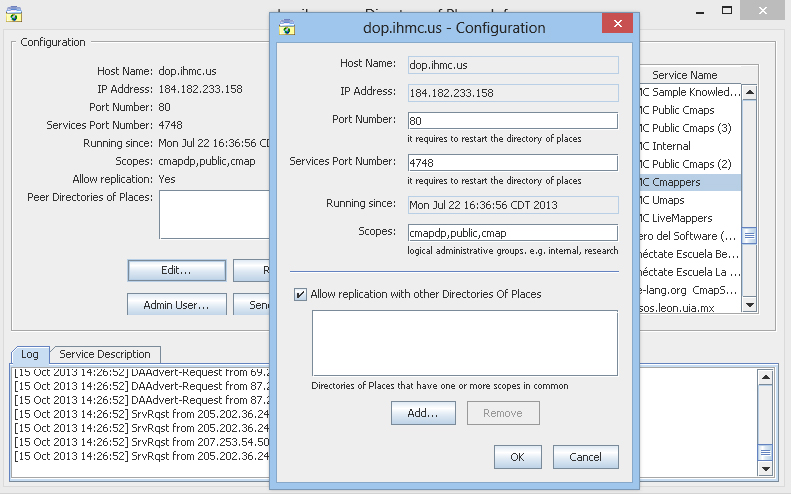
Restart the DoP for the new configuration changes to take effect.
A Directory of Places allows replication with other Directories of Places that have one or more scopes in common. To enable replication you must specify the domain name:
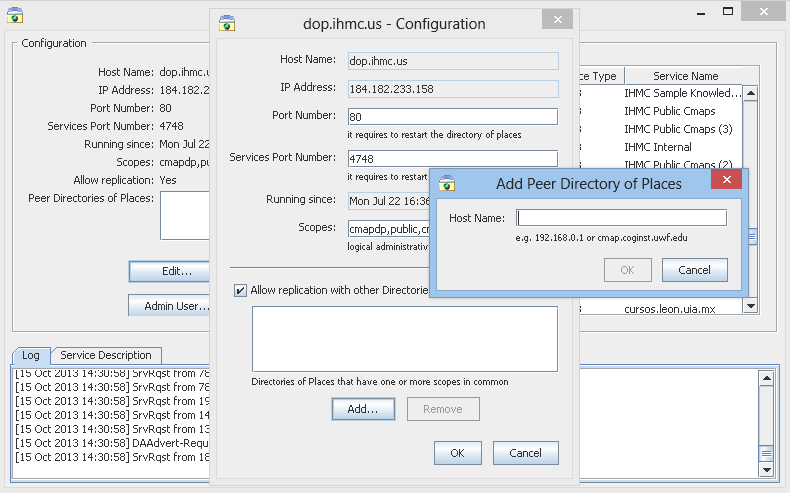
Clicking on the “Admin User…” button allows you to change the
Administration Account to access the Directory of Places (DoP), by entering the following data:

The Administrator Account provided during the DoP's installation is displayed by default.
Clicking on the “Send E-Mail...” button sends by email the DoP’s log files, for example:

The log file name is generated using the prefix “dop” and a counter, e.g. dop0.log, dop1.log, etc. being dop0.log the most recently modified.
You can manually add a Directory of Places by providing the domain name, port number, and web server port after clicking on the “Add...” button in the “Directories of Places” view.
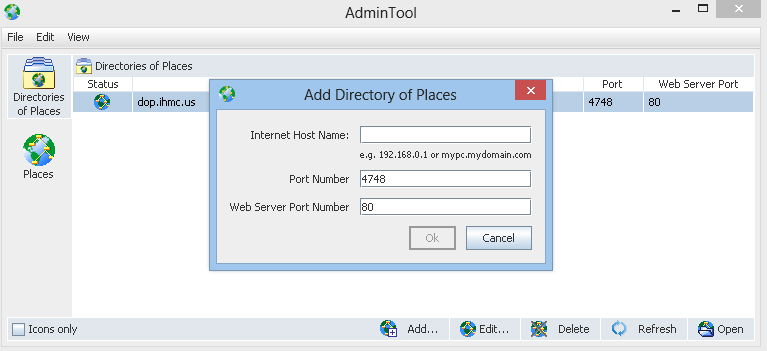
A CmapServer can be moved from one directory to another or from one computer to another, no matter what operating systems are installed (cross platform).
A CmapServer is identified within the CmapTools network by its "serverid", its unique identifier. This identifier is defined in the "serverconfig.txt" file, located in the "bin" directory, which is under the directory where the CmapServer is installed. It is therefore key that this "serverid", and in general that this "serverconfig.txt" file be kept.
The following steps show how to copy a CmapServer to another directory within the same computer or to another computer.
COPY “…/<current CmapServer installation directory>/serverRootFolder”
TO “…/<destination CmapServer installation directory>/serverRootFolder”
COPY “…/<current CmapServer installation directory>/bin/serverconfig.txt”
TO “…/<destination CmapServer installation directory>/bin/serverconfig.txt”
Important ! If you move the CmapServer to another computer, its best if you maintain the Host Name, domain name and IP Address of the original computer on the destination computer so that URL links pointing to resources stored in your CmapServer are preserved. This includes the HTML version of Cmaps already stored on your CmapServer.
If there are blanks next to “server.hostname=” and “server.ip.address=” in the CmapServer Configuration File (serverconfig.txt) on the new location, then fill them in with the Host Name and IP Address that you just assigned to the destination computer in these two locations on the "serverconfig.txt" file (located in the "bin" directory). If your host computer has more than one network card, make sure you give the IP Addres to the "server.bind.address=" parameter.
##################################################################################
# The bind address is the Internet address that the server and the
# webserver will be listening on for incoming requests. When not specified,
# the server and the webserver will listen on any/all local addresses
# (including 127.0.0.1).
#
# Unless the server and the webserver need to be configured to run in a
# multi-homed environment, it is recommended to leave this parameter
# empty.
#
# Example: server.bind.address = 123.123.123.1

server.bind.address=
#################################################################################
# The hostname is the Internet address that will be used to generate the  URLs  of  the  web
# pages of the Cmaps stored on the CmapServer, and  it  is  determined  automatically  by  the
# server.
#
# Edit this property if you want the server to use a specific hostname to generate  the  URLs.
# It is recommended that you enter a full computer name rather than an IP address.
#
# Example: server.hostname=mypc.mydomain
#
server.hostname=
# #################################################################################
# The IP address is the Internet address that CmapTools will use to contact the CmapServer and
# it is automatically determined and registered by the server.
#
# Edit this property if you want the server to register a specific IP address. Use only dotted-
# decimal TCP/IP addresses.
#
# Example: server.ip.address=123.123.123.1
#
server.ip.address=
#
##################################################################################
The following documents and sites have additional information about the CmapServer.:
The CmapForum contains documentation, answers to the questions most commonly asked, a place to provide suggestions, announcements, and troubleshooting sections. In order to post comments / questions or open a new topic in the CmapForum, you will need to register or open an account.
The Release Notes are technical notes detailing the changes or enhancement made to the features of CmapServer, organized by version and date
The Known Issues are faults or defects in CmapServer that have been documented, but not yet fixed. A “known issue” differs from a “bug” in the sense that “bugs” are unknown, or at the very least undocumented.
Frequently asked questions (FAQs) is a short list of our most frequently asked questions concerning the CmapServer.